Movement Dive Policies

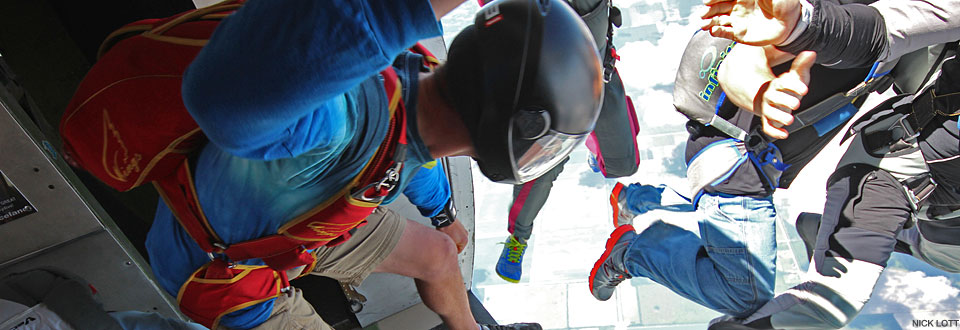
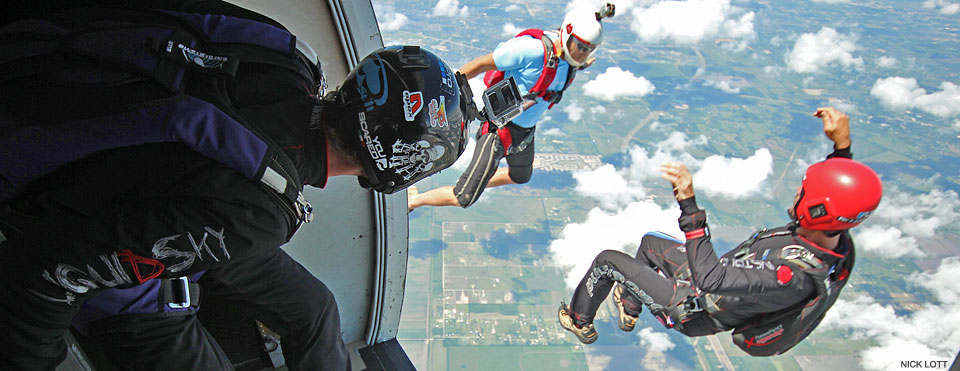
Horizontal movement jumps are fun… free flowing… and inherently potentially much riskier than jumps that fall straight down. Any jump in which jumpers plan horizontal movement other than tracking for separation after breakoff requires good planning and execution to minimize the additional risks to everyone on the load.

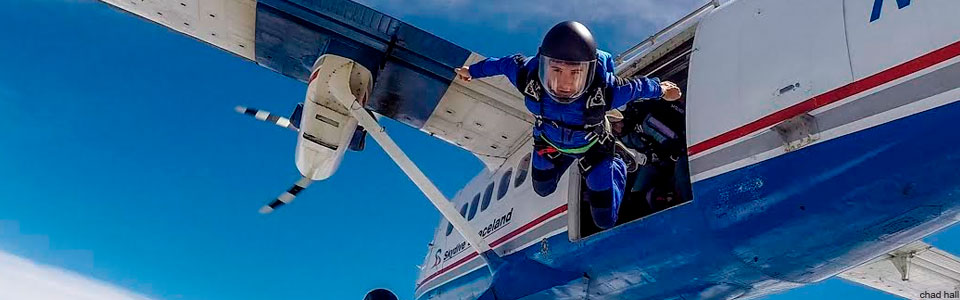
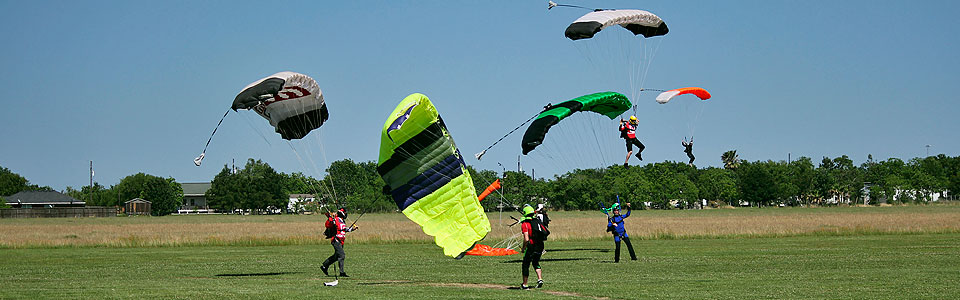
Above photo by Daniel Angulo! 

That responsibility is 100% the job of the organizer(s) doing movement jumps, and it should not be taken lightly.

Only Spaceland-approved movement leaders may lead movement jumps of any size at Spaceland.

Spaceland has developed several policies for tracking/angle jumps with the blessings of our staff and experienced tracking organizers. Please read all of and follow these guidelines to help keep us all safe.

Movement Jump Safety Basic Guidelines
  • Design your jumps and select your group with safety in mind. Consider jumper experience, flight path, group size, and winds to develop a plan that will minimize any chances of compromising other groups’ airspace. Then discuss the plan with the rest of your load, adjusting as needed to maximize safety. If you need help, ask a more experienced movement leader and/or consider getting coaching before leading these jumps.
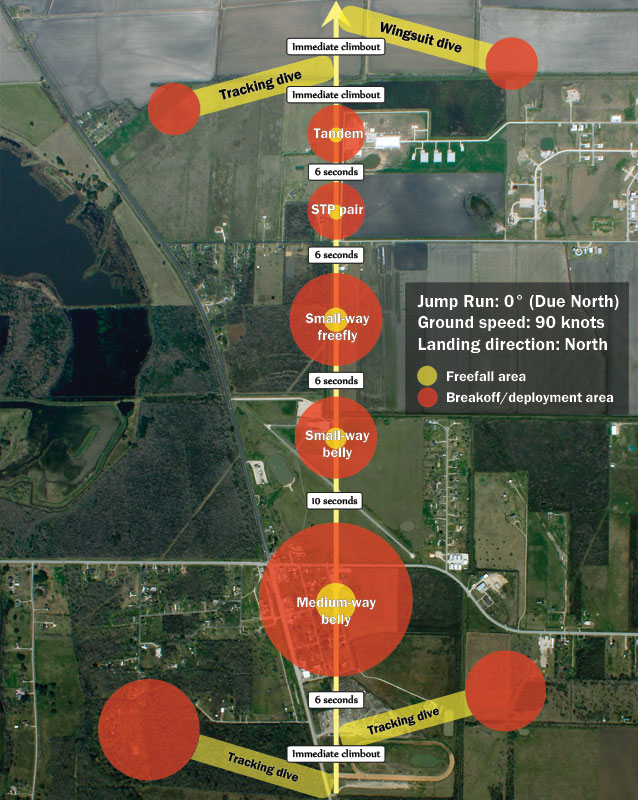
  • Use the dry erase board in the loading area to draw your flight path for the jump, and make sure all other movement groups on the load do as well, so you can visualize the plans and adjust as needed to divide the airspace safely. Jump run  is marked with a black magnetic arrow.

    Horizontal dive planning board (Spaceland Houston)
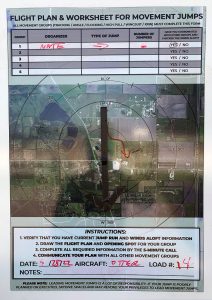
    Movement jump planning board (Spaceland Houston) – Click to expand… Can you spot the problem with this flight path? If not, please don’t lead any movement jumps until you can.


  • DO NOT break off towards the line of flight.
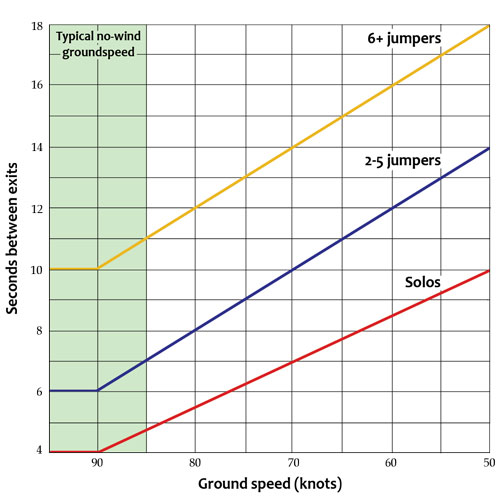
  • No more than 2 movement groups of each discipline per load without expressed approval from an S&TA or movement evaluator.
  • Always have a straight-down jump as a backup plan in case conditions such as clouds, changed jump run direction, modified exit altitude, etc., will make your primary plan unsafe.
  • New to these jumps? Jump with an experienced organizer/coach until you fully understand the risks and have sufficient technique and awareness to not increase these risks.
  • Each jumper should carry a mobile phone in a secure pocket, and program the following three numbers into it: Manifest (903-364-5103), ICE or In Case of Emergency number (family/responsible person for us to contact in case you are hurt), and the jump organizer. Call 911 first if you land out and are badly hurt, and call us second. Call us also if you land out but are unhurt to let us know you are OK and if you need a ride. Also call your jump’s organizer with the same information.
  • These jumps have a higher chance of landing off the DZ. Also, since you’ll open away from the usual jump run, we may not see you if you land out or have a malfunction. Don’t expect a ride if you land out; we’ll do our best to get you if we see you, but assume you’re on your own. If you have a cutaway, note where you opened so we can help you find your main. Identify an appropriate alternate landing area right after opening and fly conservatively to it, then make the phone calls described below.
  • Equipment Recommendations: We HIGHLY recommend AADs and audible altimeters for all skydivers (we can’t encourage this enough!). Many organizers will not include jumpers without AADs and audibles in their group, with very good reason!
  • Make sure to manifest your group as a movement jump.  If you don’t declare your intentions with manifest, the increased last-minute load organizing may result in you missing the load.
Suggested Minimum Experience for Movement Jumps
Jump type/role Minimum experience Notes
Movement jump with coach 100 jumps Must jump with an experienced movement coach/organizer.
Solo movement jump 200 jumps Must be an approved movement leader.
Small group follower (3 jumpers max) At least 100 jumps We recommend that your first 10 movement jumps be with an experienced organizer/coach. After at least 100 of these small group jumps, you may be ready for larger groups.
Group movement jumps (4+ people) At least 200 jumps We recommend that your first 100 movement jumps be small groups with an experienced organizer/coach before flying with groups of 4 or more jumpers.
Lead movement jumps At least 750 jumps Leaders must be approved by Spaceland before leading anything. We recommend that leaders have at least 200 tracking jumps as a follower and take a leading course or attend a leading briefing.

* Individual experience and skill vary widely. You may be more or less skilled at a certain jump number than others, so please consult with our safety officers/instructors/more experienced organizers before trying new types of jumps or if you have any questions at all.

Approved Leader Requirements
  • You MUST be a Spaceland-approved leader to lead any movement jumps! See above minimums table. Consult a movement evaluator, S&TA, or the drop zone manager for more information on becoming an approved leader.
  • Leaders must be effective communicators who work well with others. Cooperating with other groups/leaders is a crucial component of creating a safe movement jump culture.
  • Make a flight plan that ensures you won’t fly into others’ airspace and lets your group land on the DZ. If your jumper(s) land off due to poor planning, you may be barred from organizing these jumps until the problem has been solved.
  • Screen all jumpers for skill/experience needed for the type/size of the dive. We suggest that you do not allow open participation without regard for each jumper’s skill and experience (no zoo dives).
  • You are responsible for the safety of yourself, your group, and its plan. Select your skydivers and your plan carefully.
  • Leading on your back is NOT recommended.
  • Design your skydive to maximize the safety of all groups on the load.
  • Design your skydive around the least experienced flyer.

Ensure that everyone on the jump knows:

  • These jumps have an increased risk of forceful freefall collisions due to combined horizontal/vertical movement, and many people can be in your blind spot. Reduce risks by keeping groups small, especially with less experienced jumpers, and thoroughly briefing good technique and awareness.
  • Getting clear of the normal jump run is essential.
  • These jumps require a safety-focused plan. Know your jump’s plan and DO NOT deviate from it unless danger requires it.
  • Determine where other jumpers/groups are before flying back towards jump run and the landing area under canopy.
  • Know what to do if a jumper is left behind in freefall.

Exit Order

  • Leaders should be able to identify a wide variety of exit order considerations including scenarios for large groups, multiple moving groups, high winds, variable jump runs, wind shears, etc.
  • Leaders should value horizontal separation over vertical separation when considering exit order.


How do I get approved to lead movement jumps?
  • See minimum requirements above
  • Talk to the DZ Manager
  • Complete a written questionnaire
  • Attend a course or briefing about leading movement jumps
  • Conduct a supervised skydive with a Movement Jump Evaluator

As with other type of skydives, flyers involved in incidents caused by unsafe planning/execution may be prohibited from jumping until they obtain further training/guidance from organizers/safety officers.

Skydive Spaceland Transitions Events for Recent Grads

Skydiving Transitions events

For recent skydiving graduates, there is often a no-man’s-land between the A license and getting on good dives. Skydive Spaceland-Houston has been turning that no-man’s land into free coaching central with its monthly Transitions events.

On or near the first weekend of each month, organizers and coaches collaborate to provide free small-group coaching tailored to a particular skill, such as dive and dock, linked exits, and tracking. Future events will include competitions as well.

“The goal is to provide new skydivers with a free coaching to improve their skills and safety, the chance to network with the organizers/coaches and other new skydivers, and have an awesome time doing it,” says Spaceland marketing director Christy West.

“This was such a great experience for a new jumper like myself,” says recent graduate Nicole Ortiz. “I learned so much and I look forward to more events like this to help make me a better skydiver.”

“Thank you for taking time out this weekend to help me be a better skydiver! I really appreciate it!” added Clark Shores.

The events are hosted by Skydive Spaceland and organizer Chuck Akers, and assisted by The Ratings Center and many instructors/coaches around the drop zone donating their time. They have become a celebration welcoming newly licensed jumpers into the ranks of the experienced while providing numerous sources of good information to improve skills and safety.

“Great event, Spaceland. We need more DZs to follow suit,” said videographer Rick DeShano.

The Transitions events are open to new jumpers from any drop zone, and they are focused on skydivers with 100 jumps or less. For more information and a schedule, see Skydive Spaceland-Houston on Facebook.

Propeller Safety

There are a lot of things in life we sugarcoat, such as when answering questions like, “How do I look in this dress?” Or “How does this resume sound?” But some things in life just don’t take sugar well–they are what they are. So it is with safety around propellers, be they of the aviation, marine, or any other variety.

We get pretty comfortable moving around airplanes in the skydiving world. We board aircraft while they’re running, climb around outside the door in flight, and jump out of them at altitude. With all this familiarity, repeated several times daily, we can sometimes lose perspective on one plain and simple fact: Spinning propellers maim and kill. And if you make the mistake of getting any part of your body near a spinning propeller, chances are very good that it will be the last mistake you will make.

Fixed-wing aircraft danger zone (generic for single and twin-engine aircraft)

So we’d like to ask for your help in keeping us all safe from spinning propellers, regardless of where you choose to skydive (this isn’t just a Skydive Spaceland risk–it’s a risk at any airport). Here are 12 tips on propeller safety:

  1. Know where the propellers are on any aircraft you are approaching. This may seem elementary, but especially when you are visiting new drop zones with unfamiliar aircraft or new aircraft are visiting your home drop zone, props may be in slightly different places than what you’re used to. They are invisible when spinning, especially in low-light situations like boarding for night jumps.
  2. Never approach or walk through the propeller area on any aircraft, running or not, unless your job requires you to be there.Don’t get in the habit of walking under or next to props on aircraft parked in the hangar, for example. If you always consider the prop area to be a no-walk zone, even after hours with a beer in hand, chances are much lower that you’ll stray into the danger zone during jump operations. Also, prop edges are sharp; even if they’re not moving, they’ll often cut if you bump into them. If you’re not near them, they can’t hurt you.
  3. Stay behind (not in front of or under) the wing when approaching or departing from any fixed-wing aircraft, whether it’s running or not. Props are located on the fronts of wings or the noses of fixed-wing aircraft, so staying out of the area in front of, underneath, and inboard of the wingtips ensures you will not be in the danger zone.
  4. Be vigilant for spectators/observers around aircraft. They will often be caught up in the noise and excitement of aircraft operations and may stray into danger zones despite adequate safety signage. usually leading with a smartphone, camera, or tablet. At Spaceland, there should be no spectators in the waiting/loading areas unless they are escorted by staff (observers, media, etc.). If you see an unescorted spectator in restricted areas (whether planes are operating or not), take the initiative to politely let them know that only skydivers and staff should be in the area, and escort them back to the safe public areas. Showing them where they can safely get a good shot of the airplane loading (preferably behind a visible barrier like a fence) will usually make them quite happy and appreciative.
  5. Be vigilant for fellow skydivers/staff around aircraft propellers. Even experienced skydivers and staff can become too comfortable and/or complacent around running aircraft and walk into the propeller danger zones after a dropped item, in an attempt to talk to the pilot, etc. Be on alert for anyone in propeller danger zones whenever you are approaching an aircraft or waiting to board, and keep an eye on your buddies too.
  6. If you must talk to the pilot, do so from within the cabin or via the loader. Or you can ask manifest to relay a message via the aircraft radio. Do not approach the forward pilot door unless your job requires it.
  7. Follow instructions from the aircraft loader. Never approach the aircraft for loading ahead of the loader.
  8. Helicopter danger zone
    Helicopter danger zone

    When approaching helicopters, stay in front of or even with the boarding door. Approach from the front so the pilot can see you. Never approach from the rear, as the area around the tail rotor is the danger zone. **Note: Some helicopters may have a main rotor that dips down in the front, so directly in front of the helicopter may also be a danger zone. When in doubt, approach a helicopter from the front quarter but not directly in front (and NEVER from the rear).

  9. When approaching helicopters, wear and secure any accessories on your body. If you are carrying anything, keep it below shoulder level.
  10. When exiting helicopters (at altitude or on the ground), do not jump up and do not raise your hands/arms above your head. Hands and arms are OK above your head if you’re hanging off the strut. 🙂
  11. Do not venture into aircraft operating areas at any time unless your job requires it. For example, at Spaceland, the loading area is not a good shortcut between the hangar and the parking lot regardless of whether aircraft are loading at that moment. Spectators and students may see you hop the fence to shortcut to your car and think it’s OK–and it’s not!
  12. Never touch a propeller even when the aircraft is shut down and parked, unless your job requires it. Many incidents have occurred from hand-cranking/moving propellers.

Thank you for helping us all with this!

Whose Airspace Is It, Anyway?

Jump run

Skydiving often seems like one of the most dynamic, chaotic sports in existence. People are falling from the sky every which way, for cryin’ out loud! 🙂 In reality, the chaos is highly engineered to allow us all to enjoy our dynamic freefallin’ fun while staying safe, and that engineering starts with ensuring that each group on each load has its own airspace column (with the exception of horizontal flying dives; we’ll get to those shortly).

Why is this important? Each group that’s essentially falling straight down (everything but a tracking/tracing/wingsuit dive) needs its own vertical column of air for freefall and deployment, period. If we don’t have that, then we have groups crossing above/below each other in freefall, which carries a significantly increased risk of collisions between groups particularly if they are falling at different speeds (think freeflyers falling much faster than belly flyers). These collisions can be quite serious.

We avoid these collisions by planning each load’s exit order and exit separation timing to create a safe amount of horizontal spacing between groups. With this strategy, each group has its own predictable airspace column and other groups know where those columns are. They then know where to look for the groups that exited before/after them when deploying.

An important point to note with this each-group-has-its-own-airspace-column concept is that it assumes each group is falling mostly straight down, without any significant planned horizontal movement except for breakoff/tracking at the end. One thing we often see with solo skydivers, especially those without very many jumps, is that they can move a lot either forwards or backwards when they don’t have another jumper there as a nearby visual reference. Unintentional sidesliding is usually much less significant. Thus, if you are doing a solo skydive, primarily face 90° to (across or perpendicular to) line of flight (LOF) rather than up or down LOF. This will reduce the chances that you unintentionally backslide or track into another group’s airspace.

Horizontal Flight Dives

Jumpers planning horizontal movement (tracking, tracing, wingsuit) dives need to consult with the day’s conditions/flight plan on the Safety Stand before jumping. Each day, the pilot will post the day’s winds aloft, planned jump run, jump run groundspeed, and which way he/she expects wingsuits and trackers to fly. It’s imperative that horizontal flyers follow this plan so everyone, including pilots, knows where all groups expect to be on deployment. This is especially important for wingsuiters that can cover a couple of miles in freefall; the pilot must know where they plan to be so he/she can avoid descending the aircraft in that space.

Sample Jump Run Visualization

Here’s a sample jump run with exit separation for a hypothetical full load with several widely varying types of skydiving groups. This is one of the more complicated jump runs one would see given the mix of several small groups doing different things. However, it shows how we should exit the aircraft for maximum safety with the various groups, guaranteeing that each group has its own airspace column for freefall, breakoff, and deployment (yellow and red areas on diagram).

Sample jump run diagramPlease observe the following:

  • Horizontal flight groups should exit first (with two groups or less) and last (third/fourth horizontal groups). Wingsuiters exit after all other groups, large to small.
  • No more than four horizontal flight groups per load.
  • No delay between climbouts of successive horizontal flight groups, as they’re tracking away from each other to create separation.
  • Following the first horizontal flight groups, the exit order is as follows (loading order is the reverse):
    • Horizontal flight groups (max of 2 groups)
    • Belly flyers (large groups to small)
    • Freeflyers (large to small groups)
    • Skydiver Training Program
    • Tandems
    • The last horizontal groups if present
    • Wingsuiters
  • Separation between skydiving groups follows the exit separation chart here according to the size of the group.
  • After deploying, do not fly up or down jump run until you have identified the canopies of the groups exiting before and after you and ensured that there are no traffic issues.
  • Check your spot before exit, and if your spot is long, open a little higher so you can make it back.
  • See today’s conditions printout on the Safety Stand for any exceptions to these policies.

Further Reading

Exit Separation Between Skydiving Groups

Jump run and exit separation

As skydivers, we tend to like to do things together. We like to skydive with our friends, give each other grief about any minor mistakes during the dive, celebrate our successes, and enjoy brews together after sunset. Some people prefer solo skydives on occasion so they can work on skills or just enjoy the sky without distractions.

However, there are such things as too much and too little togetherness in skydiving. And only a few seconds might separate the two extremes when we are talking about the proper amount of time/space to leave between multiple skydivers and groups exiting the same aircraft on the same jump run. Our goal when selecting the right happy medium number of seconds to leave between groups is to arrive at a delay that does two things:

  1. Provides enough separation between adjacent groups so no groups will fall into the others’ airspace columns and risk collisions, and
  2. Keeps the entire load in an airspace box from which any reasonable skydiver should be able to land on the airport.

The risk of leaving too little time is collisions between groups, whether these are freefall or deployment collisions. But leaving too much time can spread out the jump run so much that the last skydivers out may not be able to make it back to the landing area.

So how do we decide how much time to leave? Luckily, skydivers before us have developed guidelines to tell us how much time is safe between groups based on experience. Keep in mind, however, that two major factors play into the answer.

  1. Group size. The larger the group, the higher they will break off and the more overall horizontal space the group will occupy when breaking off and deploying. Thus, you must leave more time when following out a bigger group compared to following out a solo skydiver.
  2. Ground speed of jump run. The space we want between groups for each group to have a clear column of air in which to deploy their parachutes is horizontal space, not vertical. (Vertical isn’t good enough because what if someone in the lower group has a premature deployment? Or what if someone in the upper group cuts away?) If the plane is flying slower into a headwind, it’s covering less ground per second, so we need to leave more time between groups to get the amount of horizontal distance we want.

Below is a graph showing how much time you should leave between groups of varying sizes. Remember: Exit separation is time between EXITS, not between the previous group’s exit and the start of your climbout. This graph is posted on our Safety Stand in the hangar so you can check it anytime you have a question about how much time to leave between groups.

Exit separation graph

Landing Areas: Divide and Conquer

Busy skydiving landing area

Please note: This article was updated on October 1, 2015. 

You know how the first time you came to a busy drop zone, it seemed like all the parachutes were flying randomly around the sky? But now that we are skydivers and understand flight plans, we see some degree, at least, of order in the chaos. We’d like to further increase the amount of order in our canopy flight traffic by reminding everyone that we have three separate landing areas at Skydive Spaceland: One for jumpers with D license experience to address the tighter area, obstacles, and increased traffic; another for students and slower traffic east of the hangar; and the swoop pond/alternate landing area across the runway.

One of the often-missed aspects of separate landing areas is that they’re not just about where you plant your feet–separate landing areas are designed to manage canopy traffic all the way down. Imagine there’s a 1000-foot tall wall separating each of these landing areas, and whenever possible fly your patterns under 1000 feet so you don’t fly over the landing areas you’re not targeting. This keeps students and lower-performance parachutes flying together, and the same for swoopers, so we don’t have large discrepancies in canopy speed and approach type that can lead to someone getting “run over.”

Also, remember to fly a predictable pattern regardless of where you’re landing, so other skydivers can have a reasonable expectation of where you’re going. It’s fairly common for newer canopy pilots to arrive in the pattern too high and sashay back and forth to kill altitude, but this forces all the skydivers above you to continually adjust because they can’t tell where you’re going. If you find yourself high in the pattern, learn from that for next time, and for now use a deep brake approach or your front risers to lose that extra altitude.

Landing Area Policies

Low man has the right of way in all landing areas. Do not cross the runway under 1,000 feet when aircraft are using it. The runway splits the property, so be aware that airplanes and skydivers share this property and aren’t completely separated. Both parties must consider the others’ needs to use the property safely. If you are unsure if the runway is in use, don’t cross it below 1,000 feet and you may need to land south of the runway.

Please see this article for our current landing areas divisions.


Skydive Spaceland Introduces the Safety Stand

What if every drop zone posted their safety policies and daily notes conveniently in one location in the loading area for all jumpers, old and new, to browse and learn while waiting for aircraft? Check that box for Skydive Spaceland! We’ve just posted our own Safety Stand in the hangar, complete with information on:

  • Skydive Spaceland Safety StandBasic safety guidelines
  • Aircraft safety
  • Camera jumps
  • Tracking dives and who should/should not lead them
  • Wingsuit dives
  • Today’s conditions
  • Jump run/exit separation
  • And more!

You’ll see the stand on your way into the hangar from the parking lot, so come on in, drop your gear, and come back when you have a few minutes to take a look. Get out to the loading area early for your next few jumps to soak in some of this great info, and it’s a good place to hang out on a weather hold as well. Whether you’ve been jumping for 20 days or 20 years, chances are good that you will find something on this stand that you didn’t know. If you’re a new skydiver, you won’t have been in all of the situations where you needed all of this information yet. If you’ve been around awhile, keep in mind that skydiving is evolving very quickly and so must our safety policies (particularly when it comes to dives with a lot of planned horizontal movement, such as tracking, tracing, and wingsuit dives). Even after 17 years of skydiving, I learned a lot while putting this together, so hit the loading area a few minutes early to check it out! 

Some of the information on this stand is old, and some is new. Some of it describes policies we’ve been following, but which may not have been spelled out where visiting and newer jumpers could discover them easily, and some policies are new. If you have any questions about why any of these policies are what they are, just ask one of our instructors or manager and we’ll be happy to explain the reasoning. 

I think one of the most important statements on this stand is the following, because it applies to every single one of us:

“Before trying ANY new type of skydiving activity such as freeflying, tracking, flying a camera, or flying a new canopy, consult an instructor, coach, or safety officer for tips on learning that activity safely. The biggest problem with new activities is that we don’t know what we don’t know or how we could be endangering ourselves and/or others. But these people do.”

We will also be sharing some of the specifics on this stand in future issues of FlyTips. Thanks to Skydive Arizona for the inspiration!

Stay safe out there–the life you save could be mine! 😀

Do it Right: Visualize Your Skydive

If you’ve ever played sports, chances are good that you’ve heard a coach tell you or someone on your team to visualize doing it right when they were struggling with something. Some call this practice mental rehearsal, and it’s a completely valid strategy to increase performance, because you’re training your brain to perform to the standards of that visualization.

Visualization can help you respond more quickly when faced with emergency situations, perform a more stable exit or a better track, land more softly, etc. Skydivers from STP students all the way up to world-class competitive jumpers visualize their jumps beforehand to improve their performance. While you’re learning to skydive, better performance may mean few or no repeated levels and a shorter time to your A license.

So let’s think about what visualizing good performance on a skydive means. First,you have to know what good performance will look like; your instructors will help you figure this out with ground rehearsals, previous videos, etc. When you have some free minutes between rehearsing and jumping (on the ground and/or on the way to altitude), close your eyes and transfer that visualization of your ground practice to the sky environment. Take your time especially when you’re starting out with this practice; don’t rush. Be calm, efficient, and methodical in your visualization, because that’s how you want to fly. Think about all the details that make the picture complete, such as the sound of the wind decreasing as you flare or the smell of jet fuel if you’re visualizing exit technique. All of these details will help reduce surprises and put you in that calm, ready to perform mode.

Now let’s consider what you’ll see as you perform. Let’s say you’re working on a typical exit from inside the plane, facing up line of flight. Visualize the group leaving before you, checking the spot while counting off the specified delay between groups, your instructor’s climbout, then your instructor check-in, count, and solid arched exit while looking up the line of flight and watching the plane fly straight away from you.

Now carry that visualization through your entire dive flow, seeing yourself maintain your chosen heading and performing the body movements and dive flow objectives you have planned. See yourself do all of this right the first time, then visualize your altitude checks, deployment sequence, canopy control check, canopy learning objectives, and a soft landing. You’ll be amazed at how visualizing your performance thoroughly can help you achieve that performance more effectively and possibly in fewer skydives, because you are following a predetermined plan rather than seeing it all new for the first time.

Try this on your next jump and let us know how much it helps!

Skydiver Training Tip: When to Learn to Pack Your Parachute

Packing parachutes

Hello student skydiver! As you progress to ever more awe-inspiring feats of skydiving skill in our Skydiver Training Program, do you ever wonder about the magic that happens before you strap your gear on for the next jump?

I refer of course to the magic whereby the billowing parachute, hundreds of square feet of nylon, that you lay down on the packing room floor after a jump is organized and repacked into the shoebox-sized container for your next one. Someday, you’ll have the pleasure of learning to do this for yourself. It’s a requirement to achieve your basic skydiving license, and even if you plan to pay packers to do this for the rest of your life, you must learn to do it anyway. At least once. 
So when should you take the packing class? As soon as possible, but don’t skip out on good jumping weather for it. This is Houston, after all; it will rain soon enough and bad weather is a great time for a packing class. Here’s the scoop on scheduling your packing class:
  1. Pick a weekday or a weekend day when the weather is rotten. The packers are not available to teach you to pack during busy jump days.
  2. Plan for at least 3 hours for the class and expect to sweat.
  3. Contact one of our packers directly or manifest to schedule your class.
  4. The class is $60 cash unless you are on our A license in a week program, which includes the class. 🙂
Don’t wait too long to take your class so you can become a fully licensed skydiver!

You’re the Pilot: Take Control!

Ask any group of non-skydivers what they think would be the scariest part of skydiving, and at least a few will answer, “The landing.” Ask a group of skydiving students, or even experienced jumpers, and you’ll get the same answer from a few of them.

We have the guts to throw ourselves out of airplanes in flight, yet we’re sometimes scared of piloting the assembly of nylon and string that saves our lives. But if a skydiver is scared of the parachute, he/she is often more likely to become injured on landing than a skydiver who flies confidently and safely. So the fear can become a self-fulfilling prophecy–but no one wants that! Let’s look at why some skydivers fear their parachutes and how to fix that.

First of all, fear is often caused by the unknown. No one grew up flying parachutes from childhood, so as adults learning to skydive this is a skill that we don’t know yet. It is related to the skills required to pilot an aircraft or even a car, but not quite the same, hence the potential fear.

Another potential source of fear is loss of control–and we often feel out of control on our first few skydives even if we’re not, just because everything is so new. After all, you can’t get off this ride until you reach the ground!

Put together fear and perceived loss of control, and you sometimes see skydivers that seem scared to fly their parachutes. They may perform very gradual turns and often hear radio guidance along the lines of, “Pull that toggle down further… keep pulling the toggle down to your chest… there you go.” They may also flare the parachute timidly while landing, resulting in not slowing their descent enough to land smoothly. These skydivers are also the ones that may say things like, “The wind blew me off course” after landing out or far from the target.

Flying a parachute doesn’t have to be scary. Parachutes obey the laws of physics pretty well, so all you need to do is understand the basics of those physics and take charge of the parachute. You are the pilot, so listen to your instructors and fly that thing!

“You need to realize you have control just as you do when  you are driving your car,” says instructor Raul Quinones. “Understand that you are the pilot of your own canopy. It will not go where you want it to unless you tell it to. If you want the car to turn, you have to turn the wheel. It’s the same as with your parachute–make the correction you want with your toggles (or risers once you have learned how). If the air is turbulent or bumpy, just relax and fly the canopy. Feel the canopy and where it is in relation to your body, and keep it where it’s supposed to be on landing–directly over your head.”

Raul describes the following common mistakes he often sees students and less experienced canopy pilots make:

  • Reaching out or down on landing with one hand or foot (often an unconscious intent to “break your fall,” especially if you feel off balance). This causes a diving turn. Instead, focus on keeping the parachute directly overhead and flying it so that you will slow the parachute and touch the ground with both feet at the same time. The parachute is your “safety net,” not the ground!
  • Flaring unevenly (one hand higher than the other): Same result as above, and same correction.
  • Landing downwind of the target. “Hold upwind, not downwind,” says Raul. “Select a holding area location where the wind will help you get home, not keep you from it. Stay in that area until you have permission to leave it, which is at 900 ft. Also, learn how varying winds affect where your canopy can fly over the ground and use the winds rather than fighting them. Fly the same pattern, but move your pattern’s turn points over the ground—further upwind in higher winds.”
  • Not thinking about your landing just as much as your freefall and canopy pattern. “Often people have a lot of adrenaline and just want to land, without thinking about HOW to land properly,” says Raul. “Keep focusing on your landing technique until you have landed safely and picked up the canopy.”

“Be positive and take control!” urges Raul. “Don’t stop thinking until you’ve landed.”

Skydiving Tip: You’re Not THAT Good…

Skydivers tend to be pretty confident people. We trust ourselves to save our own lives while throwing ourselves out of (ha) perfectly good airplanes towards the planet, right? We trust that we have the skills to succeed in the dives we plan. We trust that our gear will work, and even if it doesn’t, we trust that we have the knowledge and skills to handle it and still land safely.

Some of us also trust that we have infallible awareness of other skydivers in freefall and under canopy, so there’s no need for backup safety devices. “I can protect myself–you’ll never hit ME!” is something you can hear declared confidently at just about any drop zone in the world.

Here’s a news flash–you’re not THAT good. No one is, and the only way to absolutely guarantee that you will never have a chance of being struck by another skydiver is to not jump.

But what fun is that? We want to jump and play with our friends. But there is some risk–just as there is risk in skydiving, period. So just as we mitigated risk when learning to skydive by paying careful attention to our instructors to learn safe skydiving practices, and performing good gear checks, we mitigate risk when jumping with others. We plan dives within our skill levels, with objectives in mind, to increase our safety and chances of success. We keep our heads on a swivel in freefall when everyone’s not in the formation yet, and under canopy to stay aware of traffic and avoid collisions.

Despite all of our preparation, however, the chance of a collision still exists. One important way to mitigate our risk of injury or worse in the unlikely event of a collision is by wearing all possible safety gear, such as hard helmets (ideally full-face helmets) and automatic activation devices (AADs). Even highly experienced jumpers can lose track of others especially on a jump with many other jumpers, and sometimes stuff just happens. A foot to the face during a transition in formation skydiving. A vertical collision when one skydiver gets in another’s burble. A tracking collision between jumpers who didn’t see each other. Or even a totally unpredictable situation, such as a loose shoe in the face on exit as in the photo above. At freefall speeds, unconsciousness would be a very likely result of a direct shoe to the face. Thus we arrive at the AAD recommendation…

We all like to think we’re perfect, but not a single one of us is and neither are those we jump with. Follow these guidelines to help avoid incidents and injury:

  1. Plan safe skydives and get advice from instructors and experienced load organizers frequently to reduce the incidence of collisions.
  2. Give your gear a thorough check before each skydive, check your handles before exit, and get a pin check in before exit.
  3. Wear safety gear to reduce the “penalty” of any unexpected situations.

Fly safe!

Tracking Dives: The Fun and the Danger

Ah, the sunset tracking dive. What could be more fun than flying along with your skydiving friends in a flock with a beautiful sunset? After all, all the cool kids are doing it! Graduation jump tracking dive, anyone? Just kidding!!!!

If the dive goes wrong, a whole lot of things could be more fun than that tracking dive.

Tracking and angle flying dives that plan for the group to move across the sky are very fun and cool, but they can also be very dangerous both within the group and to other groups. Not to be a wet blanket, but they seriously do require solid planning and skill from each flyer to execute safely. Some drop zones are considering requiring at least 100 jumps before allowing individuals on group tracking dives, and 500 to lead such a dive.

Think about it… if a tracking dive is doing up to 50-60mph horizontal speed and the flight path angles incorrectly up or down line of flight, how long will it take you to cover the distance between your exit point and the next group on the load? How long will it take you to pass them? Not very long at all, and now you are opening in the “wrong” airspace where at the very least you’re not expected by others on the load, and at worst you are in the same airspace as other groups and opening collisions are a major risk. (Remember last week’s tip about predictable skydiving?)

There is also a significant additional risk from freefall collisions with other jumpers on your dive, particularly if any of those jumpers are inexperienced in general or with tracking dives.

So what it all boils down to is this: Tracking/angle flying dives have the potential to be much more dangerous than “regular” falling-straight-down jumps. Don’t try group tracking dives right off student status, and make sure any tracking dives you are on are well-planned. If that little voice in your head says this doesn’t sound safe or organized, speak up!

If you are considering joining or leading a tracking dive, please read the following articles to inform yourself about the risks and proper planning of these dives. Consider jumping with a coach if you really want to work on tracking. We want you and the rest of us to stay safe!

Skydiving Tip: Predictability = Safety

Plan the dive, dive the plan. You’ve been practicing this since your first student training jump. There are two reasons for a dive plan:

  1. SAFETY!
  2. Engineering the dive so you can get in maximum learning and/or performance from the jump.

Once you have graduated from a skydiving training program, there are SO MANY things you can do! You rock–you are now a licensed skydiver! But that is just a license to start learning further, not a license to do whatever you want. Safety is priority 1, always!

The goal when planning a dive is to come up with a dive we like that will be executed according to plan (or at least mostly!). Skydives are more successful and safer when things go according to plan–they are predictable. Unlike that new relationship where unpredictability can be mysterious and fun, unpredictability in the sky leads to confusion and safety issues. These could include issues within your group or between your group and others.

Here are 10 things you might want to ask yourself when planning your dive:

  1. Is there a particular exit I want to do? How should we safely climb out for this exit and what grips should we take? (Hint: Do not scrape your rig along the door as you climb out!)
  2. What do I want to do in freefall? Is there a skill I’m trying to work on?
  3. Realistically, how many people should be on the dive to achieve that objective?
  4. If you are working on a skill, is there a more experienced jumper or coach who can lay a stable base and provide feedback?
  5. What is the dive flow based on the above answers?
  6. Where should you be in the exit order for the load with this dive plan?
  7. How much time do you need between group exits with the current winds?
  8. How high will you break off and pull? Is there enough time between them for adequate separation at deployment? Is this acceptable relative to others on the dive and other groups on the plane?
  9. Where is your holding area under canopy?
  10. What is your planned landing pattern?

Likely, you won’t answer these questions all at once. For example, you will probably figure out your holding area and canopy pattern before your first jump and stick to it for the day unless the winds change. And you won’t know about where you fit in the boarding/exit order until you get out to the boarding area with the rest of the load, but you should already know where you fit in the grand scheme of things. With more experience, you’ll answer many of these questions automatically.

If at any time you feel that the size of the dive is too big for safety or that the participants on it may not be safe for that dive flow, change the plan. If you have any questions about safety or maneuvers, please don’t hesitate to ask one of our Skydiver Training Program instructors or load organizers. Also ask questions if you are on a dive doing something you haven’t done before (such as a new type of exit or group activity such as a tracking dive). Any of us will be thrilled to help you keep us all safe!

Remember–YOU are responsible for your safety, and that of your group if you are planning the dive. Take the initiative to make sure your dive plan is safe and predictable for you, your group and the rest of the load. Blue skies!

Parachute Dirt Diving

We dirt dive the freefall portion of nearly all of our skydives, but do you dirt dive your landings? Do you check the wind speed and direction at all altitudes, which way the wind will shift as you descend, etc.? If the wind direction changes, how will that change your landing pattern? As we develop more experience this becomes almost automatic, but initially we have to think about all of these aspects of winds and how the affect our canopy flight to develop this skill.

Once students graduate from our Skydiver Training Program, we occasionally see them fly a pattern that doesn’t suit the current winds, and thus they land somewhere other than where they planned. It’s usually pretty clear that the skydiver simply flew the same pattern that worked yesterday or for the majority of their training, and never looked at today’s winds or thought about how they’d affect their landing pattern and accuracy.

Ask yourself several questions before every skydive so you know everything you need to know to land safely on or at least near your target.

  1. What are the obstacles you need to avoid (such as the berm, hangar, trees, etc.)?
  2. Which side of them is downwind? (You know you don’t want to land there because of turbulence!)
  3. What are today’s winds aloft?
  4. Where is your holding area?
  5. What are your planned turn altitudes?
  6. Where over the ground do you plan to make those turns?
  7. Have you considered the speed of the winds when planning your landing pattern?
  8. Will your planned pattern ensure that you don’t cross the runway under 1,000 feet?

Next, make sure you check wind indicators on the ground (flags, tetrahedron, wind sock, pond fountains, etc.). Check before takeoff, on the way up, and once you are under canopy just like you did when you were a student. Even after graduation, are you checking the wind indicators on the way up and once you are under canopy like you did as a student?

Plan the dive and dive the plan–it’s much better than locking yourself into a suboptimal landing pattern and/or direction because you didn’t think about it until you were too low to fly the correct pattern with other traffic.

Helmets: Secured for Takeoff

We don’t have a lot of bad words in skydiving (regardless of what you might hear after the beer light comes on! ;), but there is one we can all agree on: Complacency.

com·pla·cen·cy n. — A feeling of contentment or self-satisfaction, especially when coupled with an unawareness of danger, trouble, or controversy.

In skydiving, we say someone is complacent when they think they are safe but they are acting unsafely or in an unsafe situation. This covers a number of situations, but right now we’ll focus on our behavior in the aircraft.

It’s certainly rare, but any moving or flying vehicle can come to a sudden stop for a variety of reasons. We often see people put their helmets on for takeoff, but neglect to secure them with the chin strap (usually full-face helmets that people think may stay on because of the liner’s “chin cup”). This is a clear instance of complacency because that jumper assumes the plane won’t crash. Most of the time, he/she will be right, but if she’s wrong, the consequences can be pretty major.

There is a very good reason we require helmets to be on or otherwise secured for takeoff. In the unlikely event of an aircraft issue, what good is a helmet that is not secured to your head? If it flies off it’s no help to you and a danger to everyone else in the aircraft. OK, it’s hot. We get it. But really, how much cooler is that helmet without the strap secured? Especially compared to your safety and that of everyone else on the load?

Here are a few more points to consider, from a recent conversation with Dan Brodsky-Chenfeld (you know, that world-champion skydiver who nearly died in a plane crash in 1992?).

  1. Aircraft incidents where a helmet could come in handy range from the rare and obvious (uncontrolled landings) to the more common but less obvious (hard stop due to aborted takeoff, for example).
  2. A helmet that is buckled to your chest strap cannot protect your head. What it can do is break ribs and cause internal injuries if turbulence or worse causes you to strike another jumper or the aircraft. 
  3. Dan was not wearing a helmet when the plane he was riding in crashed. He has a permanent head injury as a result, and feels that had he been wearing a helmet, he would not be taking medication for this injury for the rest of his life.

Your helmet should be secured for takeoff by either:

  1. Putting it on your head and fastening it (recommended).
  2. Clipping it on your chest strap or running the strap through the helmet.
  3. Buckling it and you into the seat belt.

In skydiving, we manage our risk to the lowest possible level so we can make as many jumps as we can. Don’t raise your risk with something as silly as an unbuckled chin strap.

As always, if you have any questions, just ask one of our many instructors! Fly safe.

Skydiving Advice: Listen With Care

Skydivers come in all shapes and sizes and from all walks of life, but If one word could be used to describe nearly all of us it would probably be “passionate.”

This is a sport we love dearly and deeply, and we love to share that passion with others. That passion, unfortunately, can cause problems in the scenario of one jumper giving another advice. If you are a skydiving student or less experienced jumper, sometimes the advice you get from random fun jumpers on the dropzone is not suited for you, so listen with care.

Most skydivers love to give back to this sport by helping out those newer to skydiving than ourselves. The stories shared among skydivers during and after hours at the dropzone are a huge learning opportunity and a major part of the fun of this sport. However, advice given around the figurative bonfire is not always something you should take as gospel, even if it comes from a very experienced jumper.

Different skydivers have different experiences and goals than you might have, and the advice they think is proper may be counterproductive or potentially dangerous to a less experienced jumper. For example, if someone is encouraging you to downsize canopies significantly, explore high-performance landings, or get on large tracking dives when you have very few jumps, that’s a red flag. They would never lead you astray intentionally, but sometimes it’s easy for people to forget just how long it can take to achieve the skills needed to do some of these things safely.

By all means, listen to advice you receive and listen well. But also listen with care, and discuss new concepts and advice with your instructors before trying them. Your Skydiver Training Program instructors are experienced in training skydiving skills and they have a good handle on what advice will be suitable for you and your particular level of skill at the moment. They’re your best judge of what you are ready to do safely and what advice you should follow.

If you are no longer a student or learned to jump elsewhere, but still have questions, also go to our instructors. They are happy to help you “vet out” advice so you can stay safe!

Blue skies and fly safe!

Landing Patterns and Winds

Landing patterns for different wind conditionsOne of the best things about skydiving today compared to some decades past is that we jump steerable parachutes. We have the ability to change our flight paths and land on target, which makes it a lot easier for us to land near the hangar and make lots of jumps in a day without quite the cardio workout of walking in from far-flung fields.
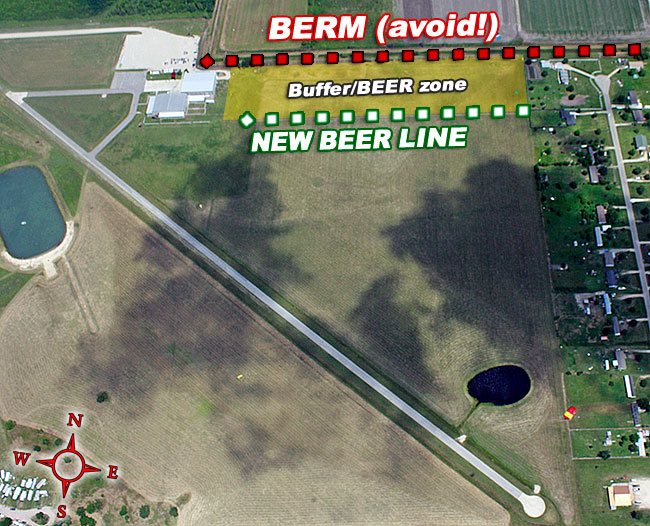
These steerable parachutes also make it possible for us to land on target in variable wind conditions, but we have to understand how the wind affects our canopy flight to fully take advantage of the situation.

Wind Speed vs. Airspeed vs. Groundspeed

The typical parachute in full flight has a forward airspeed of about 25 mph. Its groundspeed (speed across the ground), however, varies according to whether you are flying into the wind (holding) or running with the wind at your back. Let’s say we have a wind of 10 mph. If we’re holding into the wind, it’s slowing our groundspeed, so we get less forward movement as we descend. Subtract the 10 mph wind speed from your 25 mph airspeed, and your groundspeed is 15 mph.

If you’re running with the wind at your back, it is pushing you across the ground faster. So add that 10 mph to your 25 mph natural airspeed, and your groundspeed is now 35 mph. You might feel a little like Superman, flying across fields in a single… bound?… well, anyway. 🙂

Landing Pattern Adjustment

This variable groundspeed with winds clearly affects our flight patterns, because we can’t just turn in to the downwind, base, and final legs of our landing patterns at the same points on the ground and altitudes in different wind conditions and expect to land on the same target. What we should do is fly the same pattern with respect to our planned turn altitudes, but shift the entire pattern in an upwind direction in higher winds as in the diagram at right.

The higher the winds, the more upwind your pattern should shift, because your final leg into the wind will get shorter and shorter with more wind (more like the red line in the diagram).

The New Beer Line

Ah, the beer line–that line close to the hangar that causes all skydivers in sight distance to yell “BEER!!!!” with glee if you land on the hangar side of it. Did you know we now have one of these in the student/A-B license landing area at our Houston location in addition to our regular beer line? Let me explain.

Skydive Spaceland beer line
The reference line is the new beer line.

You might have noticed that we have a reference line mowed/burned in the grass, running east to west and extending out from the fence in front of the hangar. This line was created to build a buffer of safety from the north property line berm, because there is no good landing direction that favors landing next to it, just past it, or facing it. We call it an obstacle for a reason! The turbulence in that area can be ugly, potentially collapsing your canopy, and misreading the winds can leave you on the berm or in the ditch. Avoid this area at all costs!

Especially when the winds are strong out of the south, our plan with that line is to have everyone plan to land south of it, pretending that the line is the berm. This way, if the winds are stronger than you realize and you end up landing further downwind (closer to the berm) than you intended, you have a buffer before you get to the real obstacle.

So now that the reference line is the new student beer line, if you are an STP student and you land between the beer line and the berm a few things could happen.

  1. At the least you will get a reminder from your instructor that you should not be landing there.
  2. Considering that we are now calling the reference line the student beer line, you will be asked to purchase frosty beverages. 🙂
  3. We may consider that the winds are too strong for your current level of canopy skill and require you to stay on the ground until the winds drop.

If you’re a licensed jumper and land there, well–BEER!!! If you land here repeatedly, we may need to review your wind limits.

Florida students (and all other jumpers): This concept applies to you too! Anytime the winds are strong and there is an obstacle downwind of your target, create a buffer around that obstacle in your mind and fly your pattern such that you stay clear of your buffer zone.

It’s all about safety! Stay well away from obstacles in any conditions, especially windy ones. Fly safe and let us know if you have any questions!

Skydiver Training Tip: To Land Off or Not?

Scenario: You’re under a good canopy at 2000 feet. You are downwind of the drop zone and aren’t sure you can make it to the landing area. Between you and the drop zone are trees, brush, power lines, and likely all manner of unpleasant critters. Behind you is a wide open field. What do you do?

a) Get on your rear risers or toggles, trim out your canopy for a flat glide, pull up your knees to reduce drag, and try to clear the obstacles.

b) Start looking for an alternate landing area.

c) Aim for the center of the biggest tree so you can grab onto it when you land there and not fall out of it.

d) Transfer your landing pattern to the open field behind you and aim for the center of it.

Remember back to your student training… at what altitude were you taught to select a suitable landing area? That’s right–2000 feet. Above 2500 feet you should have done a controllability check and begun evaluating potential landing areas (free of hazards) nearby.

So let’s look at the answers.

(a) Get on your rear risers or toggles, trim out your canopy for a flat glide, pull up your knees to reduce drag, and try to clear the obstacles.

Good answer–if you were well above 2000 feet, not AT 2000 feet. By 2000 feet, you should have already selected an easily reachable, safe landing area.

(b) Start looking for an alternate landing area. 

By 2000 feet, you should have already done this so you can make a choice with sufficient altitude to achieve a good pattern starting point.

c) Aim for the center of the biggest tree so you can grab onto it when you land there. 

This is only a good plan if you have failed to select an appropriate landing area in time to reach it. It’s an emergency technique, not a plan.

d) Transfer your landing pattern to the open field behind you and aim for the center of it.

DING DING DING! By 2000 feet, you should have decided on a safe area to land, whether that is on the drop zone or not. Don’t get fixated on the drop zone landing area; be realistic about whether you are certain you can make that area. If not, look all around you. Like they’re always telling us on commercial airline flights, the safest emergency plan may be behind you.

Select a suitable area, transfer your pattern to that area, and land just as if you would if you were “home.” On the way down, take a quick look around for the easiest way to walk to the drop zone or the nearest road for a pickup.

Safe landings and blue skies!

And Liberty and Pin Checks for All…

As skydivers, we like to do everything right so we can skydive again… and again… and…

Lately we have been seeing a number of recent graduates, now unsupervised by instructors, neglecting their pin checks before exit. Perhaps it’s due to distraction when thinking about the upcoming jump, or perhaps you noticed an experienced jumper neglecting a pin check (shame shame!) and thought it was OK.

Either way, this isn’t a good step to skip! Pins getting pulled at the wrong time can have major consequences for our fellow jumpers and our lovely aircraft. And several things can result in a loose pin–such as a stretched closing loop, the jumper behind you bumping your rig, or leaning on the wall or bulkhead during the ride to altitude.

So please, please get a pin check in the plane before every exit, not just on the ground before boarding. If someone in your group doesn’t ask for one, offer! The life you save could be mine, or yours. :p

As always, if you have any questions about why or how to do anything regarding skydiving or our operations at Spaceland, feel free to ask any of our instructors or pilots.

Blue Skies!

Seat Belts in Jump Aircraft: Not Just for Show

Seat belts in the CaravanI once had an instructor who refused to wear a seat belt in a car. He had managed to defy all odds in two separate car accidents by not wearing seat belts; both accidents threw him out of a car that would have crushed him had he remained inside.

Unlike with cars, however, the last thing you want to occur in the (thankfully extremely unlikely) event that you are in a plane during an emergency landing or crash is to be tossed out of the aircraft or about the cabin. You are much better off (and so are your fellow jumpers) if you are fully restrained by your seat belt and skydiving rig harness. Seat belts are our first line of defense–they keep the cargo (jumpers) in place, maintaining balance in the aircraft.

Sometimes we will see a jumper, often a visiting one, refuse to wear a seat belt in one of our jump aircraft. The jumper may not put on the seat belt at all, or may loop the belt loosely around an arm or leg. One comment I’ve heard is, “Yeah, this is just easier.”

“Yeah, it’s easier for you to slam into me or the pilot if the plane goes down. Put it on.” The last thing we need in a crash is to have the impact of the crash, and then our friends landing on top of us.

Seat belts need to be buckled around your waist (with benches) or through a part of your harness away from your handles (i.e., leg strap) before takeoff. No exceptions. Then remove them at 1500 feet so you can exit the aircraft in case of an emergency that occurs high enough for you to safely jump from the plane. Helmets also need to be secured on your head or secured by your chest strap or seat belt for takeoff; otherwise they become projectiles in a crash.

As always, if you have any questions about why or how to do anything regarding skydiving or our operations at Spaceland, feel free to ask any of our instructors or pilots.

Blue Skies!

What Kind of Skydiving Helmet to Buy?

Welcome to the world of gear decisions, skydiver! You’ve been jumping an open-face helmet throughout the student program, but you’ve been seeing a bunch of the cool kids on the drop zone jumping full-face helmets of various styles. What’s right for you?
Your preferences will, of course, drive your selection. Here are a few things to think about as you shop:

Full-face helmets

These are highly recommended as they offer chin/facial protection in addition to shielding the top, back, and sides of your head. Most teams flying quickly in close proximity to each other will only jump full-face helmets, and some of the recent designs are extremely popular. However, they come with three additional challenges.

One, the full-face helmet lens can fog up particularly when it is chilly and/or very humid outside (hello, South Texas!). Most modern full-face helmets have lenses that open, so skydivers open their lenses pretty quickly after deploying the canopy to avoid this problem. Make sure you practice opening and closing the lens many times on the ground so you are very familiar with its operation and won’t have trouble when it’s time to open the lens after a skydive.

Two, lenses will need to be periodically replaced because of wear and tear, resulting in additional cost. Also, the lens opening mechanism (if it’s a helmet that opens) has small parts that will periodically wear out and need replacement. The initial cost of a full-face and the ongoing maintenance cost will be somewhat higher with a full-face.

Three, some full-face helmets (particularly older models) have a more limited field of view than an open-face. However, newer helmets generally have a large enough field of view that you hardly see the edges of the helmet at all when you’re wearing it.

Students in our Skydiver Training Program are not allowed to wear full-face helmets until after graduation–you’ve got enough to handle for your learning objectives without learning a new piece of gear! But once you graduate, it’s on. Your instructors will be happy to talk to you about full-face and open-face helmet features and preferences.

Open-face helmets

Many skydivers prefer open-face helmets so they can feel the wind on their faces, and because they have maximum visibility. Some also prefer these helmets if they have any claustrophobia. They’re definitely simpler to maintain and operate, as the only mechanism on them is the buckle/snap under your chin. They also tend to be less expensive than a full-face. However, they will not offer the facial protection of a full-face.

All helmets come in a wide range of colors and sizes, so you can get just the look you want and you can also customize the paint job as you see fit after you get the helmet. Different helmets may run large or small, so be sure to try on some demo helmets at your local drop zone if you can. If that’s not available, follow the measuring guides for each helmet manufacturer you’re investigating. Also keep in mind that some helmets are shaped a little differently and suit different head shapes better than others, so again trying before you buy is very helpful.

Any helmet you buy should have at least one pocket at your ear for an audible altimeter.

The Pro Shop at Skydive Spaceland stocks many popular helmets in full-face and open-face styles, and we can get any helmet you are interested in. We also stock demos of Cookie G3s and Phantom helmets for you to try before you buy. Volkan Obuz in the shop is happy to talk you through the different helmet features and options whenever you’re ready to start shopping.

Blue skies!

How to Open/Close a Super Otter/Supervan Skydiving Door

Have you had the chance to open the jump door on one of our Super Otters or SuperVans yet? No? Are you nervous about it? Fear not, we have the scoop!

Whether you’ve operated the door yet or not, chances are great that you’ll learn a valuable tip or few from our latest YouTube video on how and when to safely operate the side jump doors on a Super Otter or SuperVan. There are also some great tips on exiting safely without scraping your rig on the door, and what to do if the door gets stuck.

HINT: Never slam the door open or closed!!!

As always, if you have any questions about anything related to your skydive, please check with one of our instructors. See you soon!

Steve Boyd Celebrates 40 Years of Skydiving

On April 28, Steve Boyd, owner of Skydive Spaceland just south of Houston, Texas, celebrated the 40th anniversary of his first skydive. With his entire family present at Skydive Spaceland, he chose to spend some time in the air with his two sons Eric and Stephen (who also help run the drop zone) and several of the Spaceland staff on a 12-person skydive.

Boyd, whose first jump was a static-line jump from a Cessna 182 jumpmastered by his father Darnell Boyd, has been a drop zone owner/operator since the 1990s. His current drop zone, Skydive Spaceland, was built from the ground up solely for skydiving on a 130-acre private airfield and opened in March of 2000. Skydive Spaceland has since hosted several state and national record skydives, and successful United States Parachute Association National Skydiving Championships, National Collegiate Parachuting Championships, and National Skydiving Championships of Canopy Piloting.

“The sport has changed so much, from old military-style gear to much safer, more comfortable gear; from our devil-may-care barnstorming days to today’s much stronger focus on safe skydiving practices, and from ‘facilities’ with an outhouse and a shed to today’s modern skydiving resorts,” said Boyd. “Yet through all its evolutionary changes, skydiving has continued to be an extremely social sport with a small-community, close-knit feel.

“I have been very blessed to be a part of it all,” said Boyd.

[flagallery gid=35 name=Gallery]

Skydive Spaceland Expands World-Class Skydiver Training Operations to South Florida Location

For the last 13 years, Skydive Spaceland has been training skydivers to a world-class standard at its private airfield just south of Houston, Texas. Spaceland has recently entered into a partnership with a skydiving center in south Florida to provide the same top-flight level of skydiving operations to jumpers in the Miami/Palm Beach/Fort Lauderdale/Fort Myers/Naples areas.

The Florida location, formerly named Skydive Air Adventures and located in Clewiston, will be re-branded as Skydive Spaceland-Clewiston. The drop zone has been operating for more than 26 years at the scenic Airglades airport just south of Lake Okeechobee. This partnership will bring a full-time turbine (Super Twin Otter) to southwest Florida, making Skydive Spaceland-Clewiston the area’s only full-time turbine drop zone.

“We are really excited about this merger,” said Steve Boyd, owner of Skydive Spaceland-Houston. “They have really been doing it right over there and we look forward to helping them take Skydive Spaceland-Clewiston to the next level.”

Open 7 days a week and every day of the year but Christmas, Skydive Spaceland-Houston has trained thousands of skydivers in the last 13 years. One of the cornerstones of the drop zone’s success has been an innovative, constantly refined Skydiver Training Program that attracts skydiving students from around the world.

“We’ve had students come here from across the country and as far away as Germany and Australia to complete their basic skydiving license requirements in as little as five days,” says manager Jason Hyder. “We have the full-time instructors, pilots, and business to allow people to achieve their skydiving goals very quickly here. They come for the program, then stay for the great community of experienced, talented, fun skydivers who call Spaceland home.”

“We are so thrilled to be part of this organization,” said Lisa Hornsby, co-owner/operator of the new Skydive Spaceland-Clewiston with Rick Hornsby. “This place (Skydive Spaceland-Houston) is like Disneyland for skydivers and we look forward to bringing the same capabilities and opportunities to our Florida skydiving family.”

###

About Skydive Spaceland

Skydive Spaceland is a three-generation family-owned and -operated skydiving business located in Rosharon, Texas, just south of downtown Houston, Texas. First opened for business in February 2000 by Steve Boyd, Sr., Skydive Spaceland has grown into a truly world-class skydiving facility open 7 days a week and capable of handling hundreds of skydivers jumping daily. More than 100,000 skydiving students have been instructed at Spaceland, and the center facilitates nearly 100,000 skydives per year.

Skydive Spaceland has also played host to the world’s largest skydiving competition, the United States Parachuting Association National Skydiving Championships (2009) , as well as several other large competitions including the U.S. National Collegiate Parachuting Championships and multiple U.S. National Canopy Piloting Championships. Several state and national records have also been set at Spaceland including the Texas State Record 150-person skydive in 2007, 168-person skydive in 2011, high-altitude records, and multiple Women’s Texas State Record skydives held jointly as fundraisers for Jump for the Rose.

About Skydive Spaceland-Clewiston

Operating as Skydive Air Adventures, this skydiving center has been in the same location for more than 26 years with one of the best safety records in the industry. Located 4 miles south of Lake Okeechobee, the United States’ second-largest freshwater lake, the drop zone enjoys a spectacular view from altitude.

Head-Down Big-Way Camps

Head-down big way by Simon Palacio

On the weekend of August 31st/September 1st (Labor Day), Skydive Dallas will host a 2013 Texas Head-Down State Record camp to bust the previous 2010 record of 23. This year Skydive Spaceland is proud to host monthly head-down big-way camps in preparation for the event. Each month will be led by a different participant of the last Head-Down World Record 138-way formation in order to allow for the most diverse training and education opportunity possible.

There are three ways onto a freefly record event:

  1. Having been a participant of the previous record
  2. Having participated in a larger successful formation
  3. Receiving an invite based on camp/tryout performance

So if you’d like to start learning about how to become successful at larger group head down formations, if you’d like to sharpen up your bigway skills after a long winter, if you’d practice some different big-way slots you don’t often get to practice, or if you want to show off your stuff and get an invite to the record, put these events on the calendar!

Minimum skill level for group participation:
You should already be able to safely fly on level with a good grasp on proximity control in groups of at least four flyers. Perfect docking skills are not essential as they can be worked on in the camp. You should be proficient at turning 180 degrees and backtracking.

Audible altimeters, hard helmets, and AADs are STRONGLY recommended.

Camp Schedule

Weekend Organizer Representing
February 23
8:30 am ready to dirt dive
Simon Bones Houston, TX
March 23
8:30 am ready to dirt dive
Chad Ross Skydive San Diego, CA
April 13
8:30 am ready to dirt dive
Brandon Chouinard Skydive Dallas, TX
May 18
8:30 am ready to dirt dive
Chris Dixon iFly Austin
June 8
8:30 am ready to dirt dive
Aaron Necessary iFly Austin
July 13
8:30 am ready to dirt dive
Ryan Risberg Colorado
August 3
8:30 am ready to dirt dive
Manuel Guevara Skydive Sebastian, FL

Organizers

Simon BonesSimon Bones

  • First Skydive: August 30th 2003, Skydive New England, Lebanon Maine
  • First BASE jump: March 30th 2006, Spain
  • Total skydives: 3,800+
  • Freefly: 3,000+
  • Camera: 2,000+
  • Tandem: 500+
  • Wingsuit: 100+
  • AFF: 100+
  • BASE: 150+ from 40 objects
  • Cutaways: 5 sport, 5 tandem, 1 demo, 1 BASE

 Accomplishments:

  • 2nd Place (Silver) Mountain State vertical formation skydiving 4way competition, Skyventure Colorado 2013
  • Jason David Frank Guinness World Record board breaking team, 2013 Skydive Spaceland, TX
  • US National upright formation record, 2012 Skydive Crosskeys, NJ
  • 138/142 way head down formation official world record, 2012 Skydive Chicago, IL
  • Vertical World Record Formation Tryouts (Photo/Video team), 2012, Skydive Arizona AZ
  • Texas state upright formation record, 2012, Skydive Spaceland, TX
  • Vertical World Record Formation Tryouts (Photo/Video team), 2011, Skydive Sebastian, FL
  • Connecticut state head down formation record, 2011 Connecticut Parachutists Inc, CT
  • Parachutist Magazine Profile, August 2011
  • Women’s Vertical World Record (Photo/Video team) 2010, Skydive Arizona, AZ
  • Joe Genius TV show film contributor, Episode 13
  • California state head down formation record, 2010 Skydive Perris, CA
    • Texas state head down formation record, 2010 Skydive Dallas, TX
  • South Carolina state head down formation record, 2010 Skydive Carolina, SC
  • 4th Place AZ Freefly Money Meet Open Class, 2010 Skydive Arizona. AZ
  • 2nd Place (Silver) Intermediate Class Artistic Freeflying, 2009 USPA Nationals
  • 2nd Place (Silver) Advanced Class Vertical Formation Skydiving, 2009 USPA Nationals
  • 108 way head down formation official world record, 2009 Skydive Chicago. IL
  • Unofficial California state head down sequential formation record, 2008 Lodi Parachute Center, CA
  • South Carolina state head down formation record, 2008 Skydive Carolina, SC

 Ratings/Licenses:

  • USPA D-28573
  • BASE #1339
  • USPA Tandem Instructor
  • UPT Vector/Sigma Tandem Master
  • Skydive University Tandem Instructor
  • USPA Accelerated Freefall Instructor
  • IBA Wind tunnel coach (Level 4)
  • IBA Wind tunnel Flyer PRO rated
  • FAA Senior Parachute Rigger (back & seat)
  • USPA coach

Active Sponsorship by:


Chad Ross

Chad Adee Ross (March 23 organizer)

  • Age: 28
  • Hometown: San Diego, CA
  • Nationality: U.S.
  • Profession:
    • Skydiving Instructor and Coach
    • Tunnel Coach
    • Military Free Fall Instructor
    • Military Staticline Instructor

Skydiving stats:

  • First jump October 15, 2004
  • Years in Sport 8
  • Total jumps 7500+
  • AFF: 2000
  • MFF: 1200
  • VID: 300
  • Tandem: 3000
  • Freefly: 1000
  • Staticline Round: 3
  • *( 800+ MFF- Night, Combat Equipment, HAHO/HALO )
  • *CA State Head Down Formation Record
  • *CO State Belly Formation Record
  • *2012 Vertical World Record
  • *3rd Nationals 2011- Advanced VFS
  • *2nd Nationals 2012-Advanced VFS
  • *3rd Ifly Hollywood VFS 2way
  • *3rd Ifly Hollywood VFS freestyle
  • *3rd SVCO VFS 4way

Skydiving ratings/licenses:

  • USPA #2020209
  • USPA Coach
  • USPA AFF-I
  • USPA SL-I
  • USPA IAD-I
  • USPA TAN-I
  • USPA Pro
  • Wind Tunnel Coach FS- Freefly
  • Military Tunnel Coach

Tunnel: 120+ Hours

IMDB # 81MN42LZ

Chad Ross is also well known for his participation with all the successful antics associated with the Elsinore Honey Badger VFS team


Brandon ChouinardBrandon Chouinard (April 13th)

  • First jump: 1996, Oklahoma Skydiving Center
  • Home Drop Zone: Skydive Dallas
  • Total jumps: 5200+
  • Age: 37

Accomplishments:

  • 2001 15-way head down world record at Skydive Chicago (unofficial)
  • 2004 USPA Nationals – Intermediate Freeflying Gold Medal Champions (Team VIBE)
  • 2006 14-way head down Texas state record (organizer)
  • 2006 USPA Nationals – Open Freeflying Silver Medal (Team VIBE)
  • 2007 19-way head down Texas state record (organizer)
  • 2009 108-way head down world record (Skydive Chicago)
  • 2009 USPA Nationals – Advanced VFS Silver Medal (Gravity Rats)
  • 2009 USPA Nationals – Intermediate Freeflying Silver Medal (SDH In-laws – pick up team)
  • 2010 23-way head down Texas state record (organizer)
  • 2012 138-way (official) and 142-way (unofficial) Head Down World Record (Skydive Chicago)

Chris DixonChris Dixon (May 18th)

Experience

  • Total jumps: 2000
  • Total tunnel time: 3000+ hours
  • 2009 SDU,  Skyventure Orlando, 1st Place, 2way freefly
  • 2009 USPA Nationals, 2nd Place, Open Freefly
  • 2010 FIA World Parachuting Championships, 3rd Place, Freefly
  • 2011 Skyventure New Hampshire, 3rd Place, 2way Freefly
  • 2012 42 way Florida Vertical State Record, Skydive Sebastian
  • 2012 FAI 138 way Vertical Formation World Record, Skydive Chicago

Ratings

  • USPA Coach
  • IBA Tunnel Trainer Level 4
  • IBA Tunnel Instructor Level 4

Aaron NecessaryAaron Necessary (June 8th)

  • 3000+ Jumps
  • IBA Wind Tunnel Instructor and Coach at iFly Austin
  • Member of previous 3 Texas State Vertical Records (14,19,23)
  • Member of South Carolina 21 way vertical record
  • Florida 42 way vertical record
  • Current vertical World record 138 way as well as unofficial 142 way
  • I am currently a UPT sponsored athlete
  • I enjoy Freeflying, canopy piloting, long walks on the beach, and of course beer.


Ryan RisbergRyan Risberg (July 13)

  • 3000 + Jumps (freefly, video, AFF, coach, RW)
  • 2000 + Hrs Tunnel (flying, coaching and instructing)
  • FAI 138 Vertical World Record, unofficial 142
  • State Vertical Records: California 58, Texas 23 (organizer), South Carolina 21 (organizer), Nebraska 10 (organizer), Wisconsin 8 (organizer)
  • Freefly Organizer: Sebastian Invasion, Carolinafest, Chicks Rock, Redemption, Couch Freaks, Bridge The Gap, SVCO Elsinore Invasion, Twin Cities

Ratings/Licenses:

  • USPA D-22873
  • USPA Coach
  • USPA Accelerated Freefall Instructor
  • IBA Wind Tunnel Instructor Level 4
  • IBA Wind tunnel Flyer PRO rated

Sponsors:

  • United Parachute Technologies
  • Performance Designs
  • Tonfly USA
  • Vigil
  • Larsen and Brusgaard

Manuel GuevaraManuel “Manny” Guevara

  • Live in Sebastian, Florida
  • First jumped in Skydive America, August 10th 2002
  • 2800+ jumps
  • Coach and organizer at Skydive Sebastian’s fly4life school

COACHING AND ORGANIZING

  • Raeford, North Carolina – Paraclete XP tunnel camp Organizer, September 2012
  • Ottawa, IL- world record 138way August, 2012
  • Sebastian, Florida – Skydive Sebastian Invasion, December 2011 Organizer
  • Sebastian, Florida – Skydive Sebastian March Madness, March 2011 Organizer
  • Sebastian, Florida – Skydive Sebastian The Invasion 2010-2011 Organizer
  • Sebastian, Florida – Skydive Sebastian Halloween Extravaganza Organizer, October 2010
  • Chester, South Carolina- State head down record on june 5th, 2010
  • Crosskeys, NJ- State head down record, 2010.
  • Raeford, North Carolina – Paraclete XP tunnel camp Organizer, October 2010
  • Sebastian, FL – Skydive Sebastian The Invasion 2009-2010

Skydiver Training Tip: Taking the Next Step

“Congratulations, you’ve just earned your skydiving A license!”

“WooHOO! …
“…now what?”

When a skydiver graduates from our Skydiver Training Program, some hit the air flying hard and never look back. Often, however, a graduate will wonder a little bit about what to do next.

Your skydives up until this point have been tightly structured, and now you’re just being turned loose? What kind of jumps should you do? Should you jump alone? Who should you jump with if not?

The good news is that you have a LOT of choices. Skydive Spaceland is full of people who are here to help newer jumpers do fun, educational skydives. The most important thing is to not be shy! Put yourself out there, introduce yourself to experienced jumpers, ask for suggestions, and pretty soon you’ll be doing fun skydives with so many new friends you won’t be able to keep their names straight.

One great place to start is with our USPA-rated coaches, who will work with you one-on-one for only $10 plus slot. (Note: Advanced training from highly accomplished coaches in specific disciplines is also available, but will cost a little more.)  Another option is our jump organizers, who work daily with groups of skydivers of all experience levels for free (you may need to chip in for a video flyer, though).

As always, if you have any questions about a dive you’re considering or who to jump with, our instructors are more than happy to help.

Loading Area Etiquette

Getting ready to board an aircraft for skydiving is more than a little different than boarding a plane for commercial travel or getting in a car for a drive. There are concerns for personal safety, the safety of others in the plane (and the plane itself), and efficiency. Stay safe and efficient with these loading tips!

Personal Safety

  • Complete your gear checks before the plane pulls up. This means 3 rings, handles, and buckles are all in place, tightened where applicable, and with excess straps stowed. You will not be allowed to board the aircraft otherwise.
  • Make sure you have all the accessories you need (helmet, goggles, altimeter).
  • Stay behind the white fence (loading area 1) or between the hangar and the ditch (loading area 2) until the loader walks out to the plane.
Safety of Others
  • Know which direction jump run is flying, which direction to track away from other groups and fly your canopy, etc.
  • Talk to others in the loading area to see what groups before and behind you are doing and plan a safe exit order.
Efficiency
Efficient operations help us keep costs down (including jump ticket prices!) and fly more loads in a day. Be considerate of operating efficiency and other jumpers’ time by:
  • Being geared up and in the loading area at the 5-minute call.
  • Lining up right behind the ladder before the plane arrives, so you’re ready to load right away (i.e., not sitting on the benches until the plane is parked).
  • Get into the plane quickly and sit as far forward as possible. If the load is not completely full, you can shift towards the tail to gain more space when you remove your seatbelt after takeoff.

Skydiver Training Tip: Cool Weather Gear

winter clothing for skydiving
Brian Roye as the Abominable Skydiver. :p

We may be in southern Texas, but the weather is definitely cooling down! Skydiving in wintertime brings a few challenges we don’t have in summer, namely how do we stay warm while staying safe? The heavy winter clothes you need to avoid frostbite can bite you in other ways, especially those big, bulky hoodies we love so much. Loose, floppy clothing can obstruct your handles if you jump without a jumpsuit, especially your emergency handles, and the hood could get tangled in your risers, complicating your opening and/or a cutaway.

It’s best to wear the thinnest warm clothing you can (Thinsulate is a great choice) and pick clothes that aren’t super loose. Tuck any loose clothing on your torso into a nice, snug waistband, and tuck any hoods down inside the back of the hoodie. Remember, it doesn’t matter how warm you are if you can’t pull your handles!

You may also want to consider a thin neck gaiter/Buff to keep your neck warm. Ideally, this will be one that is snug enough to not blow up over your face and/or one that has a drawstring you can use to keep it below your chin.

Lastly, let’s talk about gloves–big, bulky ski gloves can be a liability in the air because it’s tough to feel handles and toggles with them. Again, look for the thinnest warm gloves you can find. Some people love latex glove liners to block the wind, and The Spaceland Pro Shop carries gloves that are suitable for skydiving in several colors. Luckily, our nice, warm indoor packing area will minimize the time you have to spend outdoors getting cold!

If you’ll be doing your first jump with us when it’s cold, we have some of this gear available for you to use, and we will also put a jumpsuit on over your clothes that will help with the wind chill. 🙂

As always, if you have any questions about whether a particular piece or type of clothing is safe for skydiving, check with one of our instructors. Blue skies and stay warm!

Skydiver Tip: Weather Watching

Weather

“What’s the weather like today? Is it good for students? What about experienced jumpers?”

If we had a dollar for every time we got that phone call, text, or Facebook message, we’d all be retired. 🙂 And as you know, the answer is usually a variety of “You can’t jump if you’re not here.”

In all seriousness though, weather and its nuances are critical to whether we can skydive or not, particularly for our Skydiver Training Program students who have a slightly narrower definition of suitable weather than licensed skydivers making their own decisions. Here are a few of the resources we use when deciding whether the weather is OK for STP students to jump or not. Bookmark these on your phone or tablet for quick reference!

  • Ground winds forecast. This page shows a forecast of wind speed and direction. Most students can jump in winds up to 22 mph, so when in doubt, come on out. 🙂
  • US AirNet (similar to above, but also shows forecasted cloud bases)
  • Forecasted winds aloft. This resource is great for evaluating on the way to the DZ, so you have an idea where to hold when flying your canopy pattern.
There are also a few phone apps you might find useful:
  • AeroWeather: Great for cloud condition forecasts (iPhone/Android)
  • Hi-Def Radar: Great for watching isolated storm cells in the summer, as in “Is it coming or going?”  (iPhone/Android)
If you have any questions about interpreting this weather information, feel free to ask your instructors or our pilots next time you’re at the drop zone. See you soon!