Skydiver Training Program Tip: How Many Dives in a Day?

It’s one of the most common questions we get about the Skydiver Training Program (other than price): How many training jumps can I do in a day? How many SHOULD I do in a day? While the ideal number of jumps in a day will of course vary with the student’s fitness, goals, and budget, there is one very strong recommendation we make for everyone:

Every time you show up to jump, plan on at least two jumps that day.

Why at least two? What if you’re trying to stretch a budget and can only afford one jump at a time? Here’s why we recommend at least two jumps in a day: Any time a student skydiver jumps after a layoff, even if it’s only a few days or a week, the first jump that day will be a re-familiarization with freefall and canopy flight to some degree. And you won’t learn new information as well while you’re getting back in the swing of things. If you are able to make two or more jumps in a day, then you are current for all of your jumps after the first, back in your groove, and ready to gain some new mad skillz. 🙂

So if you can only budget for four dives a month, for example, we’d recommend that you save your pennies and plan to do all four in one day (ideally), or two dives a day on two different days. You’ll progress faster and reduce the chances that you’ll need to repeat a level, which will also help you save some cash.

P.S.: Don’t forget that you’ll need to skydive at least once every 30 days to avoid having to repeat a level for non-currency. Give us a call at 903-364-5103 to schedule your next jump!

Skydiver Training Tip: Your First Skydiving Gear Purchase

When you’re about to graduate from our Skydiver Training Program, it’s time to start thinking about getting your own gear, and the accessories (helmet, goggles, altimeter) are the best place to start. We provide everything you need during the program, but afterwards you will need to rent our gear or buy your own. It’s a great idea to go ahead and get your own accessories for a number of reasons:

  1. They’re always available to you.
  2. They’re the accessories you picked out that you liked best.
  3. You know where they’ve been. 🙂
  4. Once purchased, there’s no rental fee.
  5. The Skydive Spaceland Pro Shop offers a free pair of goggles when you buy a helmet and altimeter at the same time (up to $20 value).
  6. These are the lower-priced, non-custom pieces of gear you’ll need on every skydive and are usually in stock so you can start jumping them right away.
  7. If you buy your accessories now, it helps spread out the financial investment of your first complete set of gear.

There are a number of choices for each type of gear—full-face vs. open face helmets, audible and visual altimeters, and various goggle styles from clear vs. colored lenses to full-wrap vs. sunglasses styles. Talk to your instructors and the pro shop about your skydiving and gear needs, and pick out some new toys for your new playground. 🙂

Skydiver Training Tip: Call Ahead to Reduce Your Wait

No one likes to wait for anything—doctors, prescriptions, someone to get the right size of shoes out of the stockroom, or even the 60 seconds you’re supposed to wait before spitting out your mouthwash. While they say all good things come to those who wait, some good things can come without waiting, especially if you plan ahead.

When it comes to Skydive Spaceland’s Skydiver Training Program, we highly recommend that you call ahead to reduce your wait time for jumps. As with any customer service business, we schedule staff to meet the expected demand on any given day. If you show up without notice and we’re not too busy, that works out fine. But if you arrive unannounced and we are slammed, chances are you’ll wait a little while before an instructor becomes available.

Any notice you can give us is better than nothing. Whether you call us a week or a day ahead, or even if you’re on your way and 20 minutes out, any lead time you give us increases our chances of having an instructor here for you when or shortly after you arrive. And of course, reducing your wait means more daylight to make more jumps!

If you want to be really proactive, schedule your next jumping day before you leave the drop zone. Give us a ring at 903-364-5103 and let’s get to jumping! 🙂

Top 11 Things to Know About Movement Jump Safety

How often have you heard this at the drop zone?

“Hey, let’s go track!” or “Hey, let’s go do some angles!”

Movement jumps are extremely popular at most any drop zone in the world, and with good reason: They’re a ton of fun! But they are most definitely not just another skydive.

Key Point: It’s extremely important that everyone doing movement jumps understands one critical fact: It is 100% YOUR responsibility to avoid the straight-down groups.  Never the other way around. This type of skydive poses additional risks to everyone on the load and needs to be treated with absolute respect.

Here are 11 things to keep in mind to make your movement jump a safe, awesome experience.

  1. Should you be doing a movement jump at all? If you are not already an accomplished belly and freeflier (with good body control and awareness at least on belly jumps, and very importantly at breakoff from all skydives, and have done some basic delta tracking drills), the answer is definitely NO. Not until you have these prerequisite skills. Without them, you have a higher risk of injuring others on your group or the load due to not being skilled enough to follow the dive plan.
  2. Should you do a movement jump with this group? The size of the jump should be commensurate with your experience. If you wouldn’t do a belly fly or freefly jump with the number of people on the tracking dive, you absolutely shouldn’t do a movement jump with them. Lower-experienced jumpers have a greater chance of not being able to stay with a big group and thus may track away from that group early, potentially into another group. They may also become very dangerous during the jump if unable to control their closing speeds to other jumpers.
  3. Get approval for your movement jump. The dive leader needs to get approval from operations staff (pilot, DZ manager, etc.) for every single movement jump. This is especially critical if the dropzone is running multiple aircraft simultaneously. The airplanes may or may not fly the same jump runs all day and may fly offset jump runs, which will significantly affect your jump planning. There are times that movement jumps may simply not be approved, or only be approved on certain loads.
  4. Who’s in charge? The person leading the jump must:
    • Be experienced at leading movement jumps
    • Have worked with coaches on leading and/or taken a leading course
    • Be  familiar with the drop zone
    • Know the direction of jump run
    • Know the day’s winds at freefall and canopy altitudes
    • Know the experience and capabilities of each person on the jump
    • Have the confidence to let people know if they should not be on that skydive, and perhaps start with a smaller movement jump first
    • Brief everyone on safe flight techniques
  5. What’s the plan?
    • What is the planned flight path?
    • What (if any) transitions are planned?
    • Where will those transitions be (over what landmarks)?
    • If doing anything but tracking in the skydive, how much time in the skydive will be spent tracking vs. how much time static-straight down?
    • Where do you plan to open canopies?
    • What’s your backup dive plan in case jump run changes significantly and/or clouds make your original plan unsafe?
    • How are you ensuring your group will not be in another group’s airspace at pull time?
  6. Communicate with the rest of the load: The leader must know what other groups are on that load and what they’re doing. Also, everyone on the plane must know what you’re doing so they know where to expect you to be. When you do a movement jump, you are intentionally going away from the spot of air your group would occupy if you weren’t tracking. It is very easy for a fast group to cover a lot of ground. If you aren’t careful to take your group away from jump run, you can easily end up above or below other groups and put quite a few people in harm’s way. Near misses between movement groups and straight-down groups, in freefall or during/shortly after deployment, are increasingly common and extremely dangerous. A good organizer will keep these from occurring with a good plan, awareness of the composition of each load, and a good selection of capable skydivers for each jump.
  7. Time of day: A good spot is critical for last load of the day, since recovering people from off landings in the dark is no one’s idea of fun. As well, know any wind trends at your dropzone. Higher winds in the morning or evening, etc., need to be considered to be sure you’re not putting yourself in a bad spot when the winds pick up or die down.
  8. During the jump: The leader must maintain awareness of the group’s location and flight skill, and be able to adjust his/her flight angle/speed to keep the group together and moving in a safe direction.
  9. Course corrections: Particularly if the leader is tracking on his/her back, their visuals of ground references may be compromised. Highly experienced jumpers in the group can and should give course corrections if needed to maintain safety of the group (distance from jump run and spot). Leading on the back is only reserved for highly experienced, full-time professionals and even then, most are only leading on their back for a few moments in the jump.
  10. Opening altitudes: Open at the planned altitudes. Sometimes people may think to open higher if the spot is very long. But as you fly back to the drop zone at a higher than expected altitude, you run the risk of sneaking up on other canopy traffic or flying into another group still in freefall from unexpected directions, plus you put yourself at a higher risk of being close to aircraft that may not expect a parachute to be open high and far from the drop zone. You don’t show up on Air Traffic Control radar…
  11. Landing off: Your chances of landing off are much higher on a movement jump. In fact, one of the toughest things to manage on these jumps is maintaining a safe distance from other groups on the jump run while also keeping a good chance of landing at the DZ. When in doubt, though, stay further from jump run! Landing off is something we’ve all trained for from the beginning, and something most of us have done successfully. A freefall or canopy collision is much less likely to end well. Remember to look at any wind indicators you can find, pick a large, clear area early, and be prepared to do a parachute landing fall if necessary. The top advice here is: If you can’t safely lead your group or be led away from jump run AND ensure 100% everyone can also land back on the dropzone, then leading/jumping on that jump shouldn’t be done. 

The sky is big, but it’s only so big when we are all taking off from and trying to land at the same place. Keep these points in mind to help ensure that we all get to play safely! 🙂


Updated March 2023

Skydiver Training Tip: Paperwork is Homework

Are you ready to skydive? If you show up for a Skydiver Training Program jump without having completing your paperwork (dive flow quiz) for each jump you intend to make that day, the answer, sadly, is “not yet.”

Why is this quiz important? It tells us that you have studied your student manual and that you are mentally prepared for your skydive. This preparation also will get you in the air earlier than if you have to review the material and take your quizzes when you arrive. And there’s not a lot of fun to be had in studying and taking quizzes while everyone else is jumping!

When you complete the solo training class or finish jumping in a training day, make sure you have the dive flow sheets for the next several jumps so you can study at home, complete your quizzes, and be ready for your next training day. If you forget your sheets, you can email us to request them.

We look forward to seeing you soon at Spaceland!

Skydiver Training Program: Early Birds Get the Jumps!

Birds and worms aside, the Skydiver Training Program student who checks in early definitely gets the jumps. Aside from just having more time in the day to skydive, there are a number of other benefits to early morning check-ins:

  • Winds are usually lower.
  • Wind conditions are usually less turbulent.
  • Temperatures are cooler.
  • You get on the schedule early and can plan out your jump day before the sleep-ins.
  • You are more likely to have a dedicated instructor for the day (later check-ins may have to share if we’re busy).
  • More time to complete your desired number of jumps for the day.

The office opens at 8 a.m. on weekdays and 7:30 a.m. on weekends. Have a great day and we hope to see you bright and early at Spaceland!

Skydiver Training Program Tip: Study for more fun!

The Skydiver Training Program at Skydive Spaceland gives you a lot of detailed information to help you become the best skydiver you can be. You can increase your success and fun on each skydive by studying the dive flows before you come out to the drop zone. Study as many dive flows as you plan to do for the day, and if you have any questions for your instructor or if there is anything you can’t find in the book, make notes of these questions to ask your instructor.

The more prepared you are for your skydives, the more relaxed and successful you will be and the more fun you’ll have! Plus you’ll be able make more jumps that day, since you won’t need much studying before each one.

More jumps per day is ideal for your learning progress as well. With fewer skydives spread out over a longer period of time, we all forget a few details in those days off of jumping.

Note: Before you leave on a training day, make sure you have all of the correct dive flow sheets to study for your next jump day.

Have a great day and we’ll see you soon!

Get Skydiver Training Tips via email!

P.S.: Like us on Facebook for Spaceland news, events, photos, and the chance to win free skydives! We also have a Spaceland Students Facebook page just for you!

Skydive Spaceland Welcomes the Supervan 900!

It’s back, bigger, better, faster, and with another blade on the prop! Our Cessna Grand Caravan recently returned from its Supervan 900 conversion and we are LOVING IT!!!! It’s not every drop zone that can call its Caravan the “fast plane” with everything else we have on the field. The Supervan is hauling jumpers to altitude fast enough to slide you to the tail if you’re not paying attention to your balance on climb. Here’s the stats on the Supervan:

Skydive Spaceland Supervan 900


  • Crew: One pilot
  • Capacity: Skydiving configuration: Maximum 17 passengers and one pilot. With seats, nine passengers or 14 with FAR Part 23 waiver
  • Dimensions
    • Length: 12.67 m (41 ft 7 in)
    • Wingspan: 15.88 m (52 ft 1 in)
    • Height: 4.32 m (14 ft 2 in)
    • Wing area: 26.0 m2 (280 sq ft)
Supervan 900 Specifications vs. OEM
Specification Standard OEM Grand Caravan* Supervan 900
Engine PT6A-114A TPE331-12JR
Horsepower 675 shp flat-rated 900 shp flat-rated
Torque 1865 2971 ft-lbs
TBO 3600 hrs 7000 hrs
Max gross weight 8750 lbs 9062 lbs *
Std. empty weight (wheels) 4575 lbs 4675 lbs
Useful Load (wheels) 4175 lbs 4387 lbs *
Climb (ISA- g.w.) 975 ft/min 1510 ft/min
Max Cruise (10,000 ft.) 175 kts 198 kts
Max Cruise fuel flow 396 lbs/hr 435 lbs/hr
Takeoff (ground roll) 1405 ft. 1054ft
Takeoff (50′ obstacle) 2420 ft 1875 ft
Landing (wheels) 950 ft 950 ft
Power loading 13 lbs/shp 10.1 lbs/shp
Stall Speed- flaps 61 kts 61 kts
Endurance (max cruise- standard fuel) 5.6 hrs 6.2 hrs
Range (max cruise- standard fuel) 915 nm 1000 nm
* With gross weight increase kit installed

Exit Order and Aircraft Boarding

If there is anything consistent among a group of skydivers, it’s the fact that we all want to make more skydives! Often what stops us is money or time, but other times it’s just plain running out of daylight. We can’t hold the sun up in the sky to get more time, but every skydiver can work to make aircraft boarding more efficient and thus allow more loads in a day and more skydives for us!

So here’s the scoop:

  1. Be at the loading area at least by the 5-minute call.
  2. Use the time to look around the loading area and see what other skydivers are on your load, and work together to plan what the exit order should be (and the reverse, what the loading order should be). There may be someone already doing this for your load, or there might not. Don’t be afraid to take charge and ask who’s doing what and work it out yourself.
  3. Be in line ready to board as the plane pulls up. Don’t sit back on the benches until the group ahead of you is fully in the plane, working on that last smoke or what have you.

Freefall Drift Simulator

Here’s an excellent freefall drift simulator from Professor John Kallend of the Illinois Institute of Technology.

Loading Order

So what should the proper exit order be with different types of skydives? Here’s how we load the plane at Spaceland (exit order is the reverse, of course):

  1. First to board: High pullers/Canopy Relative Work
  2. Wingsuits
  3. Tracking dives 2
  4. Tandems
  5. Skydiver Training Program Students
  6. Freefly groups, smallest to largest.
  7. Belly-fly groups, smallest to largest.
  8. Tracking/tracing/horizontal dives (Tracking and other horizontal skydives are approved and placed in the loading order on a case-by-case basis after approval from one of our S&TAs, load organizers, or drop zone manager.)
  9. Last to board, first to exit: Any lower-altitude individuals or groups.

Why, you may ask, did we pick this order? The answer is that we want to ensure as much horizontal separation between groups as possible. Vertical separation is nice, but it just doesn’t always cut it. What if that group that exited behind you and ended up on top of you has a cutaway? This is NOT what we want. So we’re back to horizontal separation, and consideration of freefall drift.

Think of the plane flying into the wind and skydivers falling straight down as they exit (yes, we know people don’t always fall straight down, but stay with me here :). The wind will affect us all the same according to how much time we spend in it, and think about that. The slower fallers will spend more time in the wind (potentially 20 seconds longer) and thus will drift further downwind than the faster fallers. This is why the belly flyers get out first… they will drift further aft of the exit point while the freefallers will get to their pull altitude sooner.

Students and tandems get out later as they are generally pulling significantly higher and this way they are not in the way of later jumpers pulling lower.

You may be asking why we put tracking dives and wingsuiters out first and last, since they will fall slower than freeflyers and pull lower than tandems. It’s a great question. First out and they’re tracking away from jump run, so they should not be a factor for the rest of the load. For the second group, exiting after tandems: Usually what’s happening at this point is that the rest of the load is out and the spot is getting pretty long. The aircraft may do a partial turn back toward the drop zone, or depending on the preferences of the jumpers and pilot it may just keep going further away. Either way, the spot’s getting pretty long and tracking dives/wingsuiters are both falling slower than typical freefall speeds and are moving around in the sky quite a bit, which allows them to get back toward the drop zone while staying clear of other groups (for example, if they went out first and ended up tracking partly up line of flight, they could very easily end up under other groups). Often trackers and wingsuiters will hold their exit for an even longer spot so they can safely do the ground-covering activity they like.

As always, if you have any questions about exit or loading order, check in with one of our instructors. Never be afraid to ask! 🙂

What Line Type for My Parachute?

What line type should I have on my parachute? This is a question that rarely comes up until someone has already decided on what canopy to buy, but then causes a reason to pause because no one wants to spend that much money and make a wrong decision. But who do you ask? What’s the right answer?

Skydive Spaceland’s Pro Shop has more than 15 years of experience in gear sales and testing, so here’s some information in an effort to help reduce the confusion.

Line Types

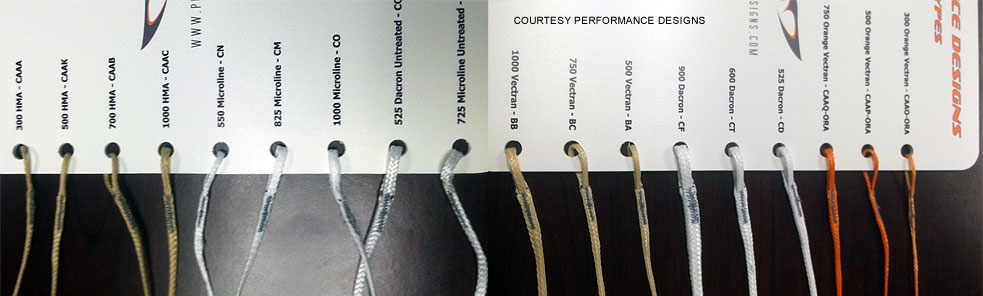
The type of line(s) used in skydiving are mostly derived from the sailing industry and are available in different blends of nylon(s) in many different weaves, the most common being:

  • Dacron
  • Spectra
  • Vectran
  • HMA

These types are available in different weights (tested breaking strengths), sizes, and sometimes colors. They also have some very different properties as we’ll discuss.

Dacron: Many new(er) jumpers have never seen this type of line, except maybe on some brands of tandem canopies. It’s a very large-diameter, white, heavy-feeling line that is very dimensionally stable. This means that over the life of the line type, it doesn’t change very much in length, either through shrinking or stretching. It is a somewhat elastic line type, which doesn’t mean you can use it for bungee jumping! Rather, the weave allows it to stretch a bit on openings but it returns to its original dimensions afterward. It is also sometimes available in black as seen on BASE gear, or red as seen on CRW (canopy relative work) canopies. One of its drawbacks in sport skydiving is the bulk of the line when packed, which causes more room to be needed in the container. It also creates a large amount of drag, reducing the airspeed and the performance of canopies; this drag is especially noticeable on smaller, higher-wingloaded parachutes.

Spectra: This is the most common line type in the skydiving market today, and for good reason. It is a low-bulk, low-drag line that wears very well and is very hard to break. However, it is not very dimensionally stable because it is susceptible to shrinking when heat is applied. With a canopy, heat is applied in the form of friction every time the slider comes down the lines on openings. Since the slider rubs more on the outside and control lines than it does on the center lines, the shrink is often uneven causing the lineset to go out of trim. An out-of-trim lineset causes poorer openings and performance than the parachute is originally designed to have. Even with this characteristic, it is still a great choice for line type because long before the lines get worn enough to break, they are out of trim and the performance has degraded enough that the jumper wants to replace them.

Vectran: This line type was developed and introduced to the industry as an alternative to Spectra, since it is also low-drag and of equal strength while also having the benefit of being heat-stabilized. This means that effectively it doesn’t change in trim over the life of the lineset. This does create a new problem, however, in that the lines will wear out and begin to break BEFORE the performance of the parachute begins to degrade. The solution for this problem is to visually inspect Vectran lines on a very regular basis, which is something that needs to be learned because Vectran lines show wear differently than other line types like Spectra.

HMA: HMA is the buzz word in skydiving these days. It seems to hold everyone’s attention, but why? It’s very low drag, it is very dimensionally stable, and it does not change in trim. It’s very strong and wears well, so it lasts a very long time. So why isn’t every canopy lined with it? It is so small that it’s hard to sew accurately and where it is sewn is a high-wear point. It does show wear in a very different way than most line types, and most importantly it doesn’t cope with damage very well at all. Other line types can get dirty and still last a long time, but HMA’s life is greatly reduced by damage, dirt, and physical wear; thus, it needs to be cared for very well. Additionally there are many weights (breaking strengths) on the market today, but very few are suitable for most sport skydivers, so care must be taken in choosing the HMA you use.

So what’s right for you? 

First, not all line types are available on all types of parachutes. The manufacturers have designed and tested their parachutes and released them to the public only with the most successful combinations. Their testing may have shown that a particular combination’s benefits do not outweigh the cons, and do not offer it. This means you should exercise caution and not select third-party manufacturer’s line kits. They may not meet the standards of the manufacturer and if they are made of untested dimensions or materials, this may produce unforeseen problems.

On many entry-level parachutes, the options are Spectra (sometimes called Microline), Dacron, and Vectran. Spectra is possibly the best choice because of its safety record, although Vectran may be a good compromise as long as the jumper is the type who is going to be very hands-on with their equipment. Dacron is rarely chosen since it’s selection is very likely to also require a larger container.

All jumpers should be aware of the expected lifespans of their linesets, and know to check or have checked the condition and trim when openings and performance degrade or visible wear begins to show. Most linesets have a life of between 400 to 600 jumps, but many factors can shorten or lengthen that lifespan. Remember to take care of your parachute, as it takes care of you. 🙂

Parachute Landing Patterns

Wind conditions anywhere can be extremely inconsistent… from 30mph to dead calm conditions, it’s important that we have a consistent canopy landing pattern plan that keeps everyone safe. Following are several guidelines we follow here at Skydive Spaceland to keep traffic moving consistently and predictably, thereby reducing the chances for a collision. Take heed of the notes below…

  • All canopy pilots are gliders; we have no engines to go-around and no chance to try again.  We must have a plan that matches everyone else’s plan.
  • Landing in the same direction as all of the canopy pilots on the load is a higher priority than landing into the ground wind.
  • Wind is rarely consistent, while landing in the same direction is paramount.
  • South side of runway (landing area #3) is ALWAYS available for uncontrolled traffic (canopy pilots that want to set their own landing direction) in the event they don’t like the direction that the DZ operations staff have picked for landing direction. See our landing area information…
  • Canopy pilots NEED a defined landing direction that can be determined while high up under their canopies, so all pilots under canopy can plan a landing that is consistent with all on the load–this is what the tetrahedron does for us here at Spaceland.
  • Low-man has the right of way… always and forever without exception. This is globally accepted in the skydiving and aviation communities- even when that low person is a slowpoke and you are a 450-degree turning highly loaded Velocity pilot.

Judging Roles

Let’s take a quick pause on rules, and discuss the various judge’s roles and who can help you with a question or a problem.  For starters, take note that a judge’s rating and their role are not the same thing.  Judges are rated (in the U.S.) as Regional, National or FAI Judges.  This rating is indicative of the level of training a judge has completed and what level of event they are qualified to judge.  Further, judges are rated by discipline (FS for formation skydiving, CF for canopy formation, CP for canopy piloting, etc).  These ratings are effectively permanent.  The role that a judge takes on for a given competition is only for that event.  The roles are Principle Judge, Event Judge, and Chief Judge.  These roles are only in effect during a single competition.

Principle Judges are the “button-pushers” who are actually scoring the skydives. Working in 3 or 5 judge panels, this is the team of folks staring intensely into monitor screens with expressions of highly focused attention.  That is, when you can see their expressions.  Most competitors only see the backs of their heads.  At a large competition, if you approach a principle judge with a question, you are probably going to be re-directed to the Chief Judge or another member of meet management who can help.  This isn’t because the judge doesn’t know the answer or is trying to be rude.  There are ethical limitations in place.  Judges don’t interpret the rules.  They apply the rules in accordance with their training and any guidance provided by the Event Judge and Chief Judge, who normally want the questions coming to them.

Event Judges can be thought of as middle-management, and their job is to the crack the whip on the Principle Judges.  If an electronic scoring system is in use, this is the person operating the system and setting up the videos to be judged.  An experienced judge, an event judge will work to ensure that absolute busts are noted and that the highest quality of judging is provided by the panel.  In recent years, Chief Judges have begun rotating newer judges into the Event Judge slot, while providing them with highly experienced panels in order to build their experience in the role.  This role is often combined with another role, or omitted entirely, during smaller meets.

The Chief Judge is an executive-level position.  A member of meet management (along with the Meet Director, Controller, Video Controller and the Jury) the Chief Judge is responsible for selecting the judges, assigning their roles, ensuring they are trained, current and performing at the required standard.  They will also control the draw and, in large competitions, the assignment of team numbers.  If you think you have received a bust that your shouldn’t have, or you think you had a problem that deserves a re-jump, the Chief Judge is the official in a position to help you quickly.  Approaching them in a reasonable fashion, you can begin to solve the problem efficiently.

Recent Changes in Judging Procedures

Editor’s note: “From the Fishbowl” is a series of short articles by U.S. National Judge Randy Connell, and it is intended to educate competitors about commonly misunderstood or little-known rules of formation skydiving. References will often be made to the Skydiver’s Competition Manual (SCM).


At the USPA Board Meeting in February, the USPA Competition Committee approved changes in some of the rules in the Skydiver’s Competition Manual (SCM) governing judging procedures for formation skydiving (FS), vertical formation skydiving (VFS), and canopy formation (CF). Let’s take a look at these new rules and their history, and how they are different in the U.S. than they are at the international competition level governed by the International Parachuting Commission (IPC).

First, here’s a quick look into the history of these rules. Until 2012, FS judges were highly restricted on how many times they could watch each skydive, and what exactly they had to look at, before deciding on a score.  They could view a given skydive a maximum of three times at full speed, and they had to view the entire skydive each time.

This method is not exactly efficient if you don’t need to see the whole jump–for example, if you only need to clarify if a single transition was a bust. Having to watch all 35-50 seconds of a jump once or twice more rather than just three or four seconds doesn’t seem like a large problem until you multiply it across several hundred scored jumps per event. By the end of the day, this inefficiency adds up to several extra hours and significantly increased fatigue and potential for error among tired judges trying to get scores out to competitors as soon as they can.

In 2011, a waiver to the rules was granted by the USPA Competition Committee to allow the judges to use slow-motion playback if needed and to allow them to view only the questionable parts of a skydive (cueing). In effect, the judges were free to use any technological means available to arrive at the true, accurate score quickly.  At the 2011 Nationals, this proved to be an effective, efficient and very accurate method.  The benefit to the teams was especially apparent on the launch, where it is not uncommon for a grip to slip off screen or go flat, resulting in a bust.  Slow-motion allowed the judges to see, and “save,” a lot of launch points.  But there was a consensus that if the judges had to slow down the video too far, the team was not meeting its obligation to show the point to the judges.  In the U.S., all parts of the waiver became part of the rules moving into the future, with one exception that we will come to.

However, the IPC chose not to adopt the full changes.  Their rules allow judges to watch the video of each jump at normal speed to determine points in time a maximum of two times. Only on the third viewing are reduced speed and cueing allowed.  Further, the reduced playback will be selected by the chief judge at the start of the event and the same reduced speed must be used on every reduced speed playback. Judges in the U.S. can vary playback speed as needed.

One exception in the U.S. rules applies if the speed of the draw indicates a potential world record; in that event, that round of the Open class will be judged in accordance with the IPC standards (five judges vs. three in the U.S., and under IPC playback rules). This will allow a team at the U.S. Nationals to set a world record as otherwise the IPC, who handles ratification of world records, would not recognize a world record judged under different rules than their own.

Moving into the future, I think the U.S. rules are going to prove to be the most effective and efficient, but only experience with both rule sets will tell us for certain.


Author’s Note: The USPA Skydiver’s Competition Manual will not be republished until May 2011, so these changes are not yet in the manual as of this writing.

Brake Line Length

Parachute/skydiverAre your parachute landings not as nice as you’d like? Have they gotten a little worse over time? The problem may be with the pilot… but then again, it might be with the brake lines you use to control your parachute. As the parachute opens, the friction from the slider grommets traveling down the lines heats the lines, and over time and hundreds of openings, the heat will gradually shrink the outside and brake lines of your canopy.

Also, as you land and drop your toggles, twists commonly occur if you don’t stow your toggles straight on your risers right away. These twists add up quickly to shorter brake lines as well.

The result? Your canopy will be more “cupped” and not fly quite as efficiently as it was designed to do. Also, your shortened brake lines might be pulling down the tail in full flight, reducing the speed your canopy needs for lift to flare at the ground.

How do you know if your brake and outside lines are too short? For your brake lines, take a look at your canopy on your next jump. With your hands all the way up, are your brake lines tight? If so, they need to be let out. If you see twists in your brake lines, simply untwist them before your next pack job; I prefer to untwist mine before my last packjob of every day. For your outside lines, take your canopy up to the loft and get the lines measured. You’re in luck, the Skydive Spaceland loft is offering free main inspections with your reserve repack through January (a $15 value)!

Save a Life! (Look for Misrouted Chest Straps)

Want to be a hero? Keep an eye on your friends’ gear when they’re getting ready to skydive or sitting in the plane. It can be easy to misroute a chest strap when you’re inexperienced, in a hurry, or just plain not paying attention, but this error can be caught with a careful inspection.

In other words: Don’t be, and don’t let your friends be, this guy:

Here are a few examples of misrouted chest straps, which could result in falling out of the harness on deployment (talk about ruining your day!):

Misrouted chest strap

Chest strap needs to go around the friction adapter first (vertical bar).

Misrouted chest strap

Chest strap needs to pass between the friction adapter and the square ring.

Misrouted chest strap

Correctly routed chest strap.

If you’re not sure if your chest strap is routed correctly, try to pull it loose from the center. If it’s routed properly, the friction adapter will push the webbing against the square ring and it won’t loosen unless you lift the square ring. If it’s misrouted, it will loosen.

Should vigilance fail and you end up in freefall with a misrouted chest strap (!!), hook your left hand around your right main lift web as you deploy to hold your harness on. Hopefully, this last tidbit is one you’ll never need!

Right Seat Safety

Riding in the copilot’s seat is a treat, but this seat requires a bit more attention to safety than a spot on the benches in the back of the plane. Here are a few tips on right seat safety from air boss Rabbitt Staib:

  • No helmets in your lap–they restrict movement of the yoke.
  • Don’t touch any aircraft controls at any time.
  • Stay low when climbing into and out of the cockpit.
  • Don’t lean on the yoke.
  • If your helmet’s on your head, remember to duck lower when getting in or out of the cockpit to avoid ceiling-mounted controls.
  • When seated in the right seat, be aware of the prop overspeed switch by your left knee and don’t touch that either.
  • Rolling down the window is fine, but put it back up before you exit.
  • Feel free to talk to the pilot, but remember that the radio takes precedence–don’t distract the pilot when he’s talking to air traffic control or manifest.
  • In case of emergency, buckle in unless the pilot instructs you to exit.
  • Whenever possible, put a smaller skydiver in the right seat (less chance of touching things they shouldn’t).
  • Move out of the cockpit into the back before jump run, so you’re not distracting the pilot on jump run.

3-Ring Maintenance

3-ring parachute attachment systemThe three-ring parachute release system was brought to the skydiving world by Bill Booth (the guy with the ZZ Top beard from the tandem video you probably watched at some point) to replace the Capewells that were in common use. For any more questions about history/function, feel free to drop into the loft to see Kyle or Rory.

Q: How often should I service my three-ring?

A: Most manufacturers recommend servicing the three-ring release once a month, but make sure to check your manufacturer’s manual for a definitive time frame.

Q: HOW should I service it?

A: (VIDEO) Pull your cutaway handle and safely set your risers aside under a weight or rubber-banded together. You will need a paper towel and a lubricant spray like silicone or teflon. Spray about a quarter-sized area of your spray onto the paper towel and draw your cutaway cables through the lubricant. You will probably see a black residue left on your paper towel. We usually give two or three pulls through and then find a clean spot on the paper towel and do a pull or two to clean off excess dirt.

After that, you can feed your cables back into your rig (make sure to thread it properly if you have a Skyhook/Collins lanyard). Once that is in place, it is time to massage your rings. Grip the rings on your risers in turn between your thumb and pointer finger and wiggle the ring around in as many directions as possible. What we are trying to do is break the memory of the fabric that has it held in position for how it normally rests. In a low-speed partial malfuntion like an out-of-sequence horseshoe, your risers may not release if they are too set in their shape. Get the end of the riser straightened, so that the middle ring lies flat out. Reattach your risers and then do a full line continuity check to make sure that you put them back on straight.

Q: Why do we do all of this?

A: To prevent a hard cutaway. Aside from the memory built into your risers and the previously discussed possibility of them staying in place, we lubricate the cables so that they slide easier when we need to use them. Also, that black residue that was on the paper towel can build up in your cable housing and cause a harder cutaway.

If you have any questions or need a demonstration, please come upstairs and see your friendly riggers, Rory and Kyle, and we will be happy to help you keep your rig in tip-top shape.

Put Your Rig on Right

Have you ever felt like your leg straps were sliding up your legs while sit flying? It’s a horrible feeling! Maybe it’s because, like many skydivers, you’re not putting your rig on quite right. If you tighten up your leg straps before your chest strap, chances are your container and hip rings will sit lower on your body, making it easier for your leg straps to get out of position when you’re sit flying.

Instead, tighten your chest strap first. This will keep your container and hip rings higher up on your body and make it harder for your leg straps to slide up.

Another tip is to use a bungee cord of the proper length through the tiny loops on your leg pads to keep your leg straps from spreading too far apart and sliding up your legs.

Thanks to Instructor/Examiner DJ Marvin for this week’s tip! If you have any questions about rig fit or adjustment, just ask one of our instructors for help.